
How to Apply Line Marking Paints: Step-by-Step Guide

A crisp, clean line on your driveway or parking lot makes the whole space look professionally finished. The catch is that a shoddy paint job will peel and fade within weeks, and it always comes down to the prep and the paint you choose.
In this guide, I will cover surface prep, the right coating for your asphalt, and the spray technique that gives you sharp edges without overspray. You will also learn the exact drying and cure times so your work stays intact for years.
From checking the temperature to dialing in your sprayer pressure, we have the simple steps you need to nail the job the first time. Let us walk through the full process together, starting with the surface.
Quick Answer
- Prepare pavement by sweeping, pressure washing, and fully drying before painting.
- Check temperature stays above 50°F with humidity between 40% and 70%.
- Select water-borne latex for most surfaces; solvent-based for oily asphalt.
- Calibrate airless sprayer to 2500–3000 PSI and test pattern on cardboard.
- Mask edges, apply painter’s tape, and maintain a steady wet edge while spraying.
Why Surface Prep Determines Line Marking Paint Longevity
Paint only does its job if the pavement underneath is ready for it. I have seen more jobs fail from a dirty surface than from any bad can of paint.
Paint only does its job if the pavement underneath is ready for it. Dirty surfaces fail more than bad paint ever will.
The paint grabs onto tiny pores in the asphalt, so it is a mechanical bond. Dust, oil, or old chipped markings block those pores, and the new paint has nothing to hold.
That is when you get peeling in weeks instead of years. Fresh hot-mix asphalt adds another problem: oils rise to the surface and stain your new lines.
You will see brownish blotches bleeding through white markings, and that is not a paint defect. It is a prep failure, plain and simple.
Treat the pavement like you would treat bare wood before a primer coat. Sweep it, wash it, let it dry, and give it the same respect you would give a sanded surface before your first coat of varnish.
A quick pass with a stiff broom and a pressure washer beats repainting the whole lot next season. Primer works the same way on wood as surface prep does on asphalt: it locks the topcoat to the base.
Remember that drying time is not cure time. Let the pavement fully dry and cure before you lay down your topcoat, just like you would wait between coats of polyurethane. Check the formula against the surface’s porosity and verify UV resistance to avoid premature fading and wash-off issues.
Use painter’s tape to mask off edges if you want crisp lines. A drop cloth keeps overspray off curbs and gutters.
The paint is just the guest at the party, but the host sets the mood. Clean the host, and your guest will stick around for years.
Choose the Right Line Marking Paint and Spray System

Matching the paint and spray system to the job saves you time and money. I’ve burned through both by grabbing the wrong gear, so learn from my mistakes. You don’t need a $20,000 striping truck for a small lot, and a brush won’t cut it on a busy highway.
For most surfaces, water-borne latex works best because it cleans up easily and holds up well. Use solvent-based paint on fresh or oily asphalt, where it bonds tighter and resists peeling. If you’re working on concrete that’s been sealed, check the label for a primer or topcoat recommendation before you commit.
Thin paint dries faster, which helps when traffic is waiting, but you’ll need extra coats to build durability. Thick paint covers in one pass but takes longer to cure, so plan for drying time vs cure time. A drying accelerator can shrink that window, but test it on a scrap patch first to avoid a sticky mess. Spray accelerators can flash-cure CA glues in seconds, a similar principle that shows how additives drastically cut wait times on coatings.
Your spray system choice depends on the line you need. Airless rigs push thick paint for crisp, wide lines, while conventional sprayers handle fine detail and tighter corners. Match the paint viscosity to your pump’s pressure rating, because too thick clogs the nozzle and too thin runs into lap marks.
Use painter’s tape to mask off straight edges on smaller jobs, and keep a drop cloth nearby for overspray. Test the spray pattern on cardboard or scrap asphalt before you start, and adjust the fan width and pressure. A satin or gloss sheen in the paint helps lines stand out and resist scuffing.
Keep VOCs in mind if you work indoors or near occupied spaces, and ventilate well. Buy quality paint, rent the right rig, and run a quick test patch. You’ll save your back, your budget, and your patience.
Set Up Striping Equipment for Straight, Even Lines
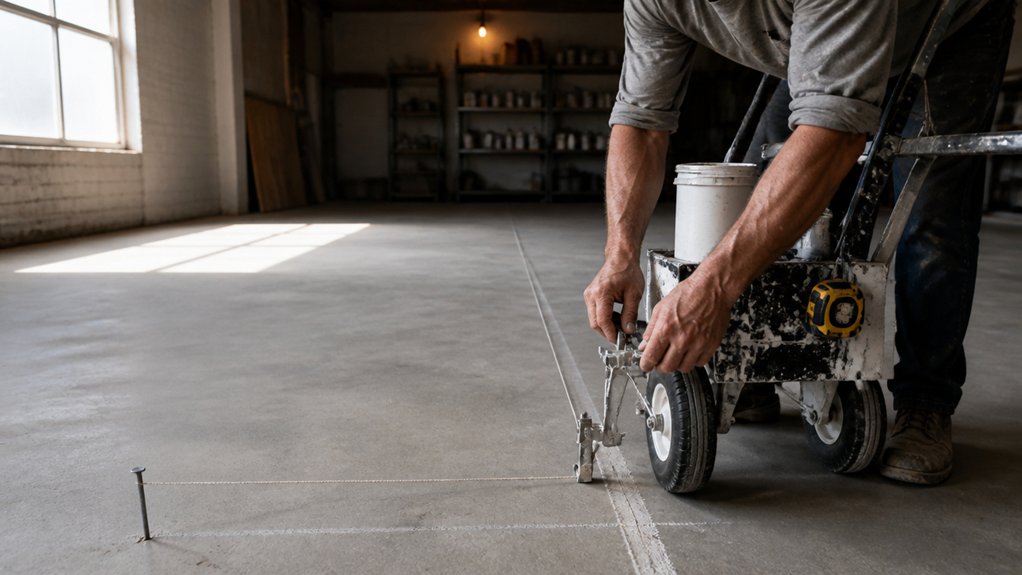
Relying on your hands to hold a straight line will only give you wavy edges and uneven coverage. The real control comes from calibrating the spray pressure, setting the tip height, and checking that your wheel tracks match the marking path.
Get those three basics dialed in and you will avoid most common problems, like thick centers or wandering edges. A fresh stripe that looks like a toddler’s art project is nearly always a setup issue, not a skill issue.
Start by checking the spray pressure against the paint manufacturer’s recommendation for your rig. Too much pressure atomizes the coating too finely, which dries before it hits the ground and leaves a dust that won’t bond.
Too little pressure gives you a spitting, uneven fan that lays down a heavy center and light edges. Use a pressure gauge at the gun, not the pump, because line loss through the hose changes the numbers. For consistent results, treat this calibration like you would a dual-zone temperature control to manage different output levels across the system.
Next, set the tip height so the fan pattern overlaps evenly on the surface. Hold the tip too high and you get a wide, thin coat with dry edges; too low and you get a heavy ribbon with visible lap marks.
Measure from the tip to the ground with the gun held at your normal working angle, and adjust the height until the fan lands crisp and full. Most striping tips have a recommended range printed on the side, so start there.
Finally, verify your wheel tracks align with your intended marking path. Park the rig so the front and rear wheels sit exactly over your guide line, then sight down the stripe arm to confirm the tip is centered on that same path.
If your wheels wander, the stripe will follow them, no matter how steady you hold the gun. A little time spent aligning the wheels saves you from redoing the whole run.
Think of the setup like prepping wood for a clear topcoat. You wouldn’t expect a smooth satin finish over a rough sanding job, and you shouldn’t expect a clean stripe from a loose rig.
Treat the pressure, tip height, and wheel alignment as your primer coat. They create the base that lets the topcoat of your paint go down wet and even.
Set up once, test on a scrap piece of concrete or cardboard, and adjust before you commit to the full line. This five minute check keeps your drying time predictable and your edges sharp.
With the pressure right, the tip at the correct height, and the wheels tracking true, you can lay down a straight stripe with a clean wet edge. The paint will flow out smooth, and you will get that professional gloss that looks like it came from a machine.
Calibrating Spray Pressure
Before the striping truck moves an inch, I set the spray pressure to match the paint’s thickness and the tip size. That’s the difference between a clean, crisp line and a spattered mess.
For airless rigs, I start at 2500 to 3000 psi, but that’s only a baseline. Your real number depends on a few things you can control.
Thicker paint, like latex, needs more push than a thin solvent-based stain. If the tip is worn, the opening is bigger, so I back the pressure down a bit to keep the flow steady.
Road speed also plays a part: the faster you roll, the more pressure you need to lay down a consistent coat. The spray fan widens as you raise the pressure, so I dial it in to hit my target line width without blowing paint past the edge.
I always calibrate on a test strip first, checking for even edges and no tails or gaps. A few minutes of patience here saves you hours of repainting and a lot of wasted topcoat.
Keep a wet edge while you work, and remember that drying time is not the same as cure time, especially for high-VOC paints. Use a drop cloth to protect nearby surfaces, and painter’s tape to define the boundary, just like you would before brushing on a satin or gloss finish.
A quick check on the fan pattern before each run is worth it. Adjust the pressure knob in small steps, not big jumps, and watch how the line reacts.
If the edges look ragged, the pressure is too low; if you see fine mist or overspray, it’s too high. Once it’s dialed in, lock the setting and keep a steady pace so the finish stays uniform, whether you’re laying down primer or a final polyurethane coat.
Setting Tip Height
Pressure’s dialed in, but the gun’s height is what makes or breaks a straight line. I set tip height first, usually 12 to 18 inches off the pavement, depending on your rig and how wide you want the coat.
Too high gives you overspray and fuzzy edges. Too low makes the paint pool thick and uneven, which turns into lap marks once it dries.
I also check the gun angle and keep it perpendicular to the surface, tilted just slightly forward as I move. That small tilt prevents the annoying “banana” curve at the start of each pass, where the paint bunches up on one side.
A quick trick before you pull the trigger: hold a tape measure near the tip to eyeball the clearance. It’s a two-minute check that saves you from repainting a whole strip, and I’ve learned that lesson the hard way after a few ruined topcoats.
Set it right, and the line tracks your wheels like a dog on a leash. Once the height is locked, I move on to checking the wet edge and adjusting my pace so the primer and finish stay even. Maintaining a 3000 PSI or higher setting ensures thick line-marking paints atomize finely without clogging, which keeps those edges crisp.
Verifying Wheel Alignment
Two quick checks save you from painting a permanent wavy line. Before I load the paint, I eyeball the truck’s wheel alignment against the chalk line.
If the front wheel tracking veers off by a hair, every stripe you lay down follows that mistake. So do this: chalk a straight reference line, then drive the striping rig slowly over it.
Check both front tires sit evenly on the line; one wheel drifting means trouble. Measure the gap between each tire and the line, and that gap should be identical on both sides. A durable reel with a braided cotton-nylon line holds chalk well for crisp, readable reference marks that make this check easier.
Adjust your steering or tire pressure if you see more than a quarter-inch difference. Fixing alignment now beats repainting a mile of crooked yellow later, and your back and reputation will thank you.
Think of it like sanding before a topcoat: you never skip the prep if you want a clean, even finish. A quick check with a tape measure is cheaper than a full redo with fresh paint, and it keeps your wet edge straight from the first pass.
Set your drop cloth, grab your painter’s tape, and mark that line like you would before laying down a satin or gloss coat. Your primer will go on smooth, and the final sheen will cover exactly where you aimed it.
Check Minimum Air and Paint Temperatures Before You Paint

Check the air and paint temperature before you even crack open the can. If the air or the paint is below 50°F for solvent-based or latex paint, or under 40°F for water-based formulas, stop right there.
Cold paint won’t flow into a smooth wet edge, and it won’t bond to the pavement like it should. You’ll end up with lap marks, wasted material, and a stripe that peels before the season ends.
Humidity is the other quiet killer, so pay attention to damp air. High moisture slows drying time way down, which means you’ll be blocking traffic longer than planned and risking dust or debris settling into the finish.
For the best results, aim for a dry day with temps in the mid-60s, and let the pavement warm up before you lay down primer or topcoat. Use a painter’s tape to test a small patch if you’re unsure, and check the can’s label for the exact drying time and cure time, not just when it feels dry to the touch. Nitrile gloves offer a reliable barrier against paint solvents and cleaners if you need hand protection while handling cans or tools.
And remember, this isn’t about rushing the job; it’s about doing it once so you don’t have to sand down or strip a bad coat later. Keep a drop cloth handy for overspray, and always read the VOC warnings if you’re working in a tight space.
When the conditions are right, the paint will level out with a clean sheen, whether you’re going for gloss on a stripe or satin on a fence line. If it’s too cold or too damp, just wait.
Your time, material, and traffic cones will thank you.
Minimum Safe Temperatures
Paint temperature matters more than most people think, and skipping the thermometer means you’ll be scraping off failed lines later. Check both air and paint temps before you load the rig, because cold surfaces wreck adhesion and drying.
For water-based paint, pavement and air must hit at least 40°F, and solvent-based needs 50°F. Below those marks, drying stalls, the film stays soft, and you’ll get lap marks or brush strokes that won’t level out.
Trust the forecast, not your gut, and plan your work in milder windows so you keep a good wet edge and avoid a cloudy finish. Watch the air temp at the height where you spray, including wind chill, because that’s what the paint feels.
Check the paint temp at the gun tip, not the bucket, since the line can cool as it travels. Measure the pavement surface temp too, because shade keeps concrete colder than open sun for hours.
Look at the next few hours of weather trends, not just the current reading, since a warm gust can turn into a cold drizzle fast. If the numbers are borderline, wait, because a warm day always beats a rushed one.
Also remember that primer and topcoat behave differently in cold, so let each coat dry fully before adding the next. Cure time is longer than drying time at low temps, so keep traffic off the lines longer than you think. For best results, aim for humidity levels between 40% and 70% to ensure the film forms properly without trapping moisture.
Use a drop cloth and painter’s tape to protect curbs and gutters, and pick a satin or gloss sheen that reflects light without blinding drivers. Solvent-based paints have higher VOCs, so ventilate well and store cans above freezing overnight.
Humidity and Drying Impact
Humidity is the sneaky variable that ignores your temperature readings. I have watched perfect 70°F days turn into tacky messes when the air felt like a wet blanket.
High humidity slows latex drying kinetics, which is the chemical process of water escaping the film. Your line stays soft for hours and picks up tire treads like a sticky souvenir.
Moisture cure hazards show up when dew forms on cooling pavement, trapping water under the paint before it sets. That is why I check air temp, surface temp, and relative humidity before I mix anything.
If it is muggy, I push the dry time estimate out by half. You cannot fight physics, but you can outwait it.
Dry air beats warm air every time. I keep a wet edge with a roller extension and use a satin topcoat only when the forecast promises low humidity.
I also lay down a drop cloth and tape off the edges, because a fresh coat that stays soft is a magnet for dust and bugs.
For wood finishing, I switch to a fast-dry varnish with low VOC content, and I sand with 220 grit between coats to avoid brush strokes.
Lap marks appear fast in humid air, so I work in full strips and never stop mid-wall.
My rule is simple: watch the weather app, check a hygrometer, and plan your paint day around the driest afternoon.
Patience pays off because a hard cure beats a soft, sticky mess every time. Permeability targets of at least 150 g/m²·day ensure trapped moisture escapes instead of brewing trouble beneath the film.
Heating Latex Paint Properly
Heating latex paint makes a real difference on the job, but only if you watch the thermometer closely. I always check the air and pavement temps before I start, and if it’s below 50°F, I pack up and wait.
Cold paint gets thick and hard to control, which leaves a messy, uneven line on the concrete. I heat the paint to between 90 and 120°F at the gun tip, and never hotter, or you’ll cook off the additives that keep the topcoat flexible.
Wind chill matters just as much as the ambient air, since a cold breeze can drop your working surface fast. I also keep an eye on humidity, because damp air slows the drying time even when the paint is warm, which risks lap marks.
Before I commit to a full lot, I spray a small test patch to see how the paint lays down and how long it takes to dry. That little check is cheaper than redoing a whole parking lot with a bad primer or a ruined sheen.
Warm paint flows smooth through the gun, and it cuts the drying time, so you can get back to the next coat sooner. Trust the thermometer over your gut, and you’ll avoid brush strokes, blotchy spots, and a wasted afternoon.
Keep your paint in a warm spot before mixing, and use a drop cloth or painter’s tape to protect anything you don’t want overspray on. A steady wet edge is easier to hold when the paint stays fluid, and that’s the whole secret to a clean, uniform finish.
For a durable, breathable alternative on masonry surfaces, consider a slaked limestone mineral coating that offers similar application control with a weathered, matte finish.
Apply Line Marking Paint in Even Coats and Stencils

Applying line marking paint in even coats is the key to clean results, whether you’re doing parking stalls or a crosswalk. Keep the gun moving at a steady pace and avoid jerky motions, because uneven speed leaves blotchy patches you’ll regret later.
For stencils, press every edge down tight and tape all corners. Any gap lets paint bleed underneath and ruins that crisp arrow or handicap symbol.
Here’s a quick cheat sheet I use on site:
| Issue | Cause | Fix |
|---|---|---|
| Blotchy coat | Uneven speed | Maintain 10–12 mph |
| Bleeding edges | Loose stencil | Tape down all corners |
| Thin coverage | Low pressure | Bump psi to 60+ |
| Overspray | Tip too high | Lower gun height |
Overlap each pass slightly to keep the wet edge from drying before you come back. That’s the simplest way to avoid lap marks and get a smooth, uniform topcoat. Silicone funnels prevent collapse and make pouring line paint from bulk containers cleaner, reducing spills and wasted material.
Your primer and paint need the right drying time before you add another coat, so check the label for cure time. Don’t rush or you’ll pull up the finish and leave brush strokes or roller marks.
Use a drop cloth under the work area and painter’s tape for any edges you want to protect. Low VOC paints are easier on your nose, but they still need the same steady hand.
Fix Common Line Marking Paint Problems: Thin Centers and Wide Lines
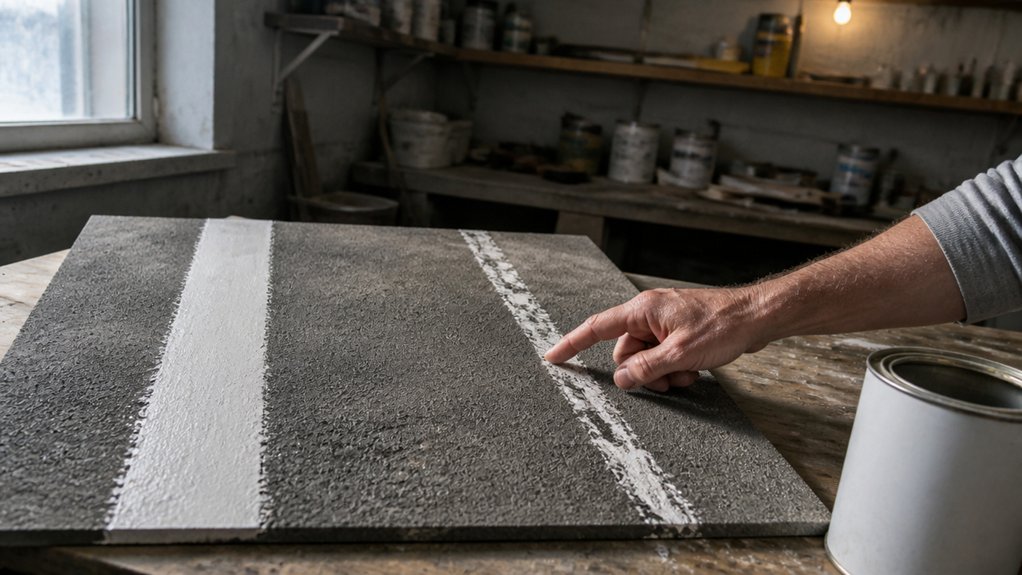
Thin centers and wide edges are the two most common line marking problems you will run into. The fix usually comes down to adjusting your air pressure or checking your equipment for wear.
Thin centers and wide edges usually point to air pressure or worn gear—fix those first.
A thin center happens when your atomizing air pressure is too high, since the extra air blows paint away from the middle of the spray fan. Crank the tank pressure up a notch or lower the air pressure to bring the pattern back together. Wide lines usually mean a worn tip or the gun is held too high off the surface. Swap out the tip and lower the gun angle so the fan hits the ground square.
One-sided coverage means the tip is clogged, so clean it with solvent or replace it entirely. If the line width keeps shifting, check the wheel alignment on your striping truck, since drift causes uneven coverage. Always adjust one variable at a time and test on scrap cardboard before you commit to the real surface.
Use a wet edge to keep the paint flowing smoothly, and watch your drying time so you do not recoat too soon. Wipe the tip with a rag dampened in thinner every few passes to prevent buildup. Keep a drop cloth under the rig to catch drips, and use painter’s tape as a guide for straight edges.
Hold a consistent gun height and speed, and keep the spray fan perpendicular to the line. Check your primer and topcoat compatibility if you are marking over old paint, and match the sheen to the surface condition. A matte or satin finish hides minor flaws better than gloss, so pick accordingly.
Remember that low VOC paints dry faster, so you may need to move quicker or lower the air pressure. If the line still looks ragged, test a finer sanding grit on the surface to smooth out bumps before painting. Practice on scrap until the pattern is sharp, then trust your setup and paint the real line.
How Long Before Cars Can Drive on Fresh Paint? Drying Times

Nobody should drive over fresh paint until it’s dry to the touch, but that can take anywhere from 10 minutes to a few hours. The exact time depends on your paint type, the humidity, and the temperature.
Fast-dry water-borne paints, often used for road markings, can handle light traffic in under 10 minutes at 77°F with low humidity. On cooler, damp days, you’re waiting much longer, so plan for that.
You don’t guess when to reopen the road; you test it gently with your fingertip. If the paint smears or leaves a mark on your skin, keep the barriers up.
Thicker coats, like a 25-mil film, dry slower than a thinner 15-mil job. That extra thickness needs more time to lose solvent and harden, so don’t rush it.
Schedule your painting when the weather favors quick drying, like a warm, dry afternoon with a light breeze. Always test the surface before letting cars through, because a single skid mark means repainting the whole line.
For a DIY driveway or garage floor, use a water-based acrylic or latex paint with a low VOC label. These dry faster than oil-based enamels, and you can check the can for the manufacturer’s dry-to-touch time.
Keep a drop cloth and painter’s tape handy to block off the area while you wait. If you’re marking a line, a satin or gloss finish holds up better to tire wear than a matte one.
Remember that drying time is not the same as cure time. Drying means the topcoat feels dry to the touch, but cure time is when the paint fully hardens, which can take days.
Frequently Asked Questions
Can Line Marking Paint Be Applied Over Damp Pavement?
No, line marking paint should not be applied over damp pavement, as moisture will cause the coating to peel and blister within weeks. You must wait for the surface to be completely dry, which typically takes 24 to 48 hours after rain depending on temperature and airflow.
Humidity prevents the paint from forming a proper mechanical bond, so even a light morning dew can ruin your striping job. If you must test, lay a rubber mat on the concrete for an hour and check for condensation underneath; that tells you the true moisture level.
For best results, use a moisture meter on the pavement and aim for a reading below 10% before you start. Also, consider a primer designed for porous surfaces if you’re painting over old, sealed asphalt, since it helps the topcoat grab. Drying time is your friend here, so schedule the work for a warm, breezy afternoon, not after a misty night.
Always broom off any loose dirt or dust first, because sweeping creates a clean anchor point that paint can grip. One coat of high-quality traffic paint is rarely enough, so plan for a second pass after the first tack dries, usually within 30 minutes. Zero shortcuts mean zero callbacks, so treat that damp concrete as a hard stop until it’s fully cured.
How Do I Remove Old Glass Beads Before Repainting?
To remove old glass beads before repainting, you must sweep or scrape the surface thoroughly so fresh paint can bond properly. Start with a stiff broom to clear loose debris, then follow with a wire brush or power broom for any stubborn, embedded beads. Don’t rush this, as leftover beads will cause poor bead retention and weaken your new markings’ visibility and durability.
For hardened residue, try a scraper with a sharp blade, but avoid gouging the pavement. A power broom works best on large areas, while a handheld wire brush handles tight spots or edges. Wait for the pavement to be completely dry before you begin, ideally 24 hours after rain, or the beads will clump.
If you’re dealing with a thick old layer, a heat gun can soften the binder, making removal easier. Consider searching for “thermoplastic paint removal techniques” for more advanced methods. Always inspect the surface under sunlight to catch any shiny remnants you might have missed.
What Happens if I Paint Over Mold Without Bleaching?
Painting over mold without bleaching traps live growth beneath the paint film, which guarantees only a temporary fix, not a cure. The fungus will eventually push through the coating, causing peeling, bubbling, or dark stains to bleed through your fresh finish.
If you skip proper cleaning, you also risk voiding any paint warranty, since most manufacturers require a stain-blocking primer on a clean surface. Use a 10% bleach solution, scrub with a stiff brush, then rinse and let the area dry for at least 48 hours before priming.
For a durable result, apply two coats of an oil-based or shellac-based primer, which seals the spores and blocks tannins and discoloration. This approach works better than latex primers, which can reactivate mold growth when moisture returns.
Search for “mold remediation before painting” to find detailed prep guides, but remember the golden rule: never paint over an active infestation. A clean, dry surface is your only reliable foundation.
Is Primer Ever Needed on Concrete or Asphalt?
No, primer is never truly needed on clean, sound concrete or asphalt. In my years of painting, I have learned that a properly prepared surface gives you all the grip you need without that extra coat.
The real secret is mechanical bonding, not chemical adhesion. Scuff the pavement with a 40 or 60 grit disc, then power wash it and let it dry for a full 48 hours. That open, porous texture locks the coating in far better than any primer ever will.
One practical tip: if the old surface is chalky or dusting, use a bonding agent instead of a full primer. It is thinner and penetrates deeper, acting as a sealer without building a film. Skip the primer, focus on the prep, and you will save time and money.
How Long Should New Asphalt Cure Before Painting?
New asphalt should cure for 7 to 14 days before painting, though cooler weather can stretch that window. I never rush traffic paint adhesion, so I test for moisture and oil first, since damp or fresh pavement simply won’t hold the line.
A simple plastic sheet test works best. Tape a square of clear plastic to the surface, leave it for 24 hours, and if condensation forms underneath, you’re not ready.
Also, check for a dull, gray appearance rather than a dark, glossy sheen, which signals residual oils. For a fast-curing option, use a water-based acrylic traffic paint, but only after the surface passes both tests. Warm, dry days above 60°F speed up the cure process considerably. Patience here prevents peeling and costly re-striping later.
Rounding Up
Applying line marking paints comes down to surface prep, paint temperature, and drying discipline. Sweep and degrease the concrete first, then warm the paint to the manufacturer’s recommended range before you load the striper.
Check the forecast before you start: no rain, no dew, and air temperature above 50°F. Test a small patch on the lot to confirm adhesion and coverage, then mark your guide strings and pull crisp, steady lines.
Time the drying window with a stopwatch, not a guess, and block off the area until the paint is fully cured. If you skip this, you will be re-striping within weeks.
Your next read: choosing the right line marking paint for asphalt versus concrete.


