How to Apply Boat Hull Paints: Step-by-Step Guide

Boat hull paint fails most often because of rushed prep, not bad product. You can scrub and sand with 80 grit all day, but if you skip curing time or use the wrong roller, your finish will blister before the season ends.
The full process covers surface prep, stir technique for biocides, and coat counts for high wear zones like the waterline.
You also need to respect the 24 to 48 hour window before launch, because a dry touch means nothing.
This guide walks you through every step, including primer selection and tip for avoiding fuzz from solvent resistant tools.
Let’s get your hull ready for a smooth, lasting coat.
Quick Answer
- Inspect, scrub, sand, and patch hull with epoxy filler before priming.
- Stir paint from bottom up; avoid shaking to prevent air bubbles.
- Use solvent-resistant roller and brush-cut edges before long wet passes.
- Apply two full coats, plus a third on high-wear areas like the waterline.
- Check label for cure time; launch only after full solvent release.
Prep the Hull First: It Determines How Long Bottom Paint Lasts
Before you open the can of bottom paint, the real work starts with the hull. The prep decides how long the paint lasts, and most people mess this up.
You cannot skip the hull inspection if you want to avoid paint failure later. Look for cracks, blisters, or flaking that will destroy a fresh coat in just a few months.
Scrub the hull with a stiff brush and mild detergent to remove salt, grease, and old wax. Rinse it well and let it dry completely before you sand.
Sand the entire surface with 80-grit paper to knock down old paint and create a tooth for the new coat. Feather any rough edges so the transition is smooth and even.
Patch any cracks or chips with a marine-grade epoxy filler. Let it cure fully, then sand the patch flat with the surrounding area.
Wipe the hull down with a tack cloth to remove all dust. Any leftover grit will show under the new paint and ruin the finish.
Apply a proper primer that matches your bottom paint system. The primer seals the hull and gives the topcoat a uniform base to bond to. Verify the chemical base matches your substrate, whether it is fiberglass, wood, or metal, to ensure proper adhesion.
Check the drying time on the primer label, not the cure time. You can recoat after the primer dries, but wait the full cure time before launching the boat.
Stir the bottom paint thoroughly, but do not shake it. Shaking adds air bubbles that create pinholes in the dried film.
Roll on the first coat with a short-nap roller, keeping a wet edge as you work. Overlap each pass by half the roller width to avoid lap marks.
Apply the second coat within the recoat window listed on the can. If you wait too long, the paint dries hard and the next coat will not bond.
Keep the boat out of the water for the full cure time, even if the paint feels dry. A soft cure means the paint will peel or blister when it hits the water.
Use painter’s tape to mask the waterline and any through-hull fittings. A clean edge looks professional and keeps paint off parts that need to stay bare.
Avoid high-VOC solvents and use a low-VOC thinner if you need to thin the paint. The lower smell makes the work easier in a closed space.
Work in the shade on a mild day, and never paint in direct sun. Heat makes the paint skin over too fast, trapping solvent underneath and causing bubbles.
Check your sanding grit before you move to the topcoat. If you sand the primer with 120-grit, you get a smoother finish than 80-grit, but do not over-polish.
Give the final coat a light sand with 220-grit after it cures, only if you plan to add a slick antifouling layer. This knocks down any dust nibs.
Store leftover paint in a sealed can with the lid pressed tight. Write the date and the paint type on the lid so you know what you have next season.
A well-prepped hull makes the paint last two or three seasons longer than a rushed job. Take your time, and the payoff is a clean, smooth bottom that does the job.
Stir Bottom Paint So Biocides Stay Mixed and Suspended

You’ve already done the hard prep work: sanded the hull, smoothed it out, and laid down a solid primer. Now the bottom paint has to earn its keep, but those heavy biocides sink fast and settle like mud in a jar. If you don’t stir, you’ll spread thin, useless patches where the copper and boosters have already dropped to the can’s bottom.
Pigment suspension isn’t fancy chemistry; it’s simply what keeps the active ingredients evenly spread across your hull. Stir from the bottom up, scraping the can’s corners hard with a wooden paddle or a clean stir stick. Keep mixing every few minutes while you roll, because settling happens quicker than you’d think.
A professional shaker at the paint store helps get things started, but don’t rely on it alone once the can is open—orbital three-axis motion from a professional-grade unit only re-suspends settled solids before the lid is cracked. Watch for color streaks in your roller tray or on the hull; those streaks mean the mixture has separated again. That’s your cue to stop rolling and remix the can thoroughly.
Stir often, stir deep, and your paint will fight growth evenly over the whole season. Skimp here, and you’re just painting water over a dirty bottom.
Use a Solvent-Resistant Roller and Brush for an Even Coat

An even coat starts with the right tools, and the roller is the most important one. A cheap roller can soften or fall apart when it meets solvent-based paint, leaving fuzz stuck in your finish.
That ruins the surface and wastes your effort, so buy a cover rated for solvent-based products. Check the label twice before you commit, and you will avoid a mess you have to sand out later.
Use a roller with a dense nap that keeps its shape and holds enough paint for long passes. A flimsy cover sheds fibers and skips patches, which forces you to go back over the same spot.
That creates lap marks and uneven sheen, so quality here pays off in the final gloss. For the brush work, cut in around thru-hulls, corners, and edges before you roll anything.
Keep your wrist loose and let the brush glide, not jab, so the paint flows into the surface. A stiff hand leaves brush strokes and ridges that show up under a topcoat.
Roll in long, steady passes, and keep a wet edge by working from wet paint back into dry paint. This prevents overlap lines and keeps the coat consistent from start to finish.
Work in sections, and keep the roller loaded but not dripping, so you get even coverage without runs. Overlap each pass by about half the roller width, and avoid pressing hard into the surface.
That pressure creates thin spots and roller marks, so let the paint do the work. Use a drop cloth to protect the deck, and painter’s tape on any hardware you do not want coated.
Apply a primer first if the surface is bare, then follow with a solvent-based topcoat in the sheen you want. Drying time matters, so wait for the tack to clear before you recoat, and check the cure time before you put the boat back in service.
VOCs are higher in solvent paints, so work in open air and wear a respirator if you are in a tight space. The result is a smooth, glass-like hull that looks professional, with no drama and no redo.
For bare aluminum hulls, use a copper-free formula like TotalBoat Alumipaint AF to prevent galvanic corrosion and environmental damage.
How Many Coats of Bottom Paint Do You Need? (Plus High-Wear Areas)
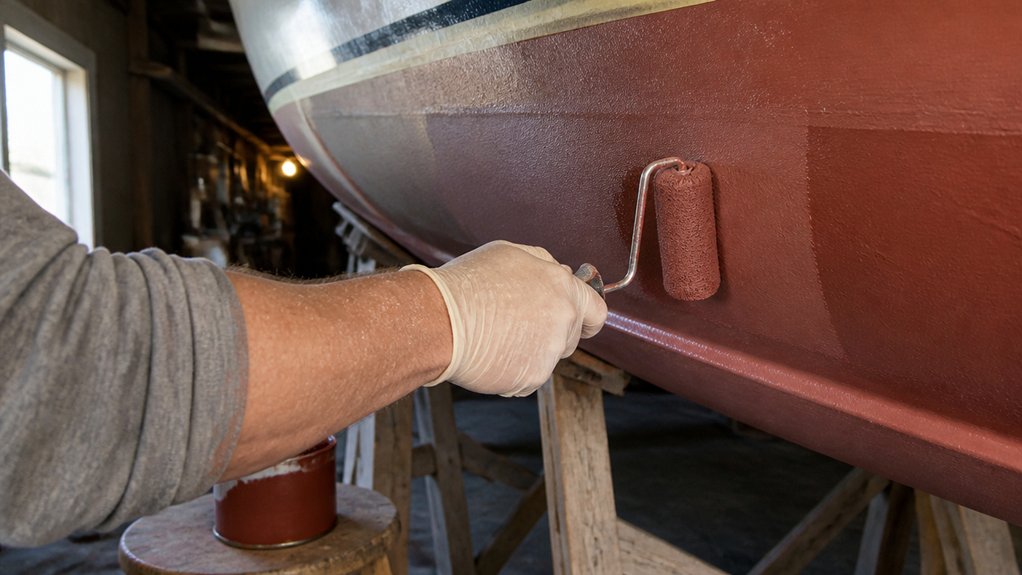
Most bottom paints need two full coats, and that’s not a suggestion, it’s the rule. One coat leaves thin spots that barnacles love, so follow the label’s layup schedule exactly.
I learned this the hard way last spring, scraping a fouled hull for days. A solvent-resistant roller cover helps you work wet into wet, and stir often because biocides settle fast.
For high-wear areas, add a third coat to the waterline, the keel’s leading edge, the rudder, and the bow. These spots take constant abuse, so extra protection costs about $30 in paint but saves hours of scraping later.
Keep your overlaps smooth so you don’t create ridges that catch debris. Use a fine sanding grit, like 220, to knock down any drips before the next coat.
Remember that drying time is not cure time, so wait the full interval between coats. A drop cloth and painter’s tape protect nearby surfaces, and a low-VOC paint helps keep the fumes manageable. You’ll also need to maintain VOC compliance at or below 50 g/L to meet environmental and garage work regulations.
Two coats standard, three where it counts, and you’ll avoid brush strokes and lap marks. That’s the practical rule for a clean, durable finish.
Dry Time and Launch Windows: Don’t Launch Too Soon or Too Late

Don’t rush to launch as soon as the bottom feels dry to the touch. Antifouling paint stays soft underneath that surface skin, still releasing solvent as it cures, so splashing early can make the coating slough off and strip away your protection.
You’re really waiting on solvent release, not a dry finger test, and that’s what makes launch timing tricky. Most ablative paints need a full 24 to 48 hours in the open air before they hit saltwater, and cool, humid days stretch that window even longer.
I learned this the hard way once when I watched a fresh bottom cloud up like a milkshake the moment it went in. That paint failure cost me a full recoat and an extra day on the hard, so now I treat the clock like part of the prep.
Some heat-resistant coatings cure to the touch in as little as 30 minutes but still require a full 24-hour cure before service.
But don’t let the boat sit too long either. Some hard epoxy antifoulings have a max window of about two weeks, after which the surface oxidizes and needs a scuff sanding with 220 grit before you can splash.
Check the label on your can for the specific dry time and cure time, and match it to your local forecast. If you’re laying down the final coat on a warm, breezy morning, that 48-hour minimum might shrink, but never rely on guessing.
A simple rule that has never failed me is paint on Thursday, launch on Saturday. That gives you the full two-day cure, a clean weekend on the water, and you’ll still look like you know exactly what you’re doing.
Keep a drop cloth and painter’s tape handy while you brush on the antifouling, because drips and overspray on the boot stripe are a pain to clean after curing. Use a roller with a short nap or a brush with a wet edge to avoid lap marks, and don’t thin the paint unless the label says so, since that messes with the solvent release schedule.
Frequently Asked Questions
Can I Paint Over Old Antifouling Paint?
Yes, you can paint over old antifouling paint, but only after a thorough compatibility check and adhesion test. Start by pressure washing the hull, then scrape away any loose paint and feather the remaining edges with 80 grit sandpaper.
If the old coat is sound and firmly bonded, you are good to proceed. However, check the solvent type: if the existing coating is a single-part eroding formula, apply a compatible tie coat primer before the new topcoat, otherwise you may get peeling.
For a quick test, tape a small patch of new paint over a cleaned area and let it dry for 24 hours. If it pulls up in a solid sheet, you must fully strip back to bare gelcoat and start fresh. This also works for hard racing antifoulings, where a soft overcoat will fail quickly.
How Do I Fix Blisters Before Repainting the Hull?
To fix blisters before repainting the hull, you must grind out each one completely, then dry and test the area before any filling. Start with a 36 grit disc on a grinder, feathering the edges until you reach sound laminate, and wipe the voids with acetone.
After grinding, let the surface dry for at least two weeks, or use a moisture meter to confirm readings below 15 percent. If any dampness remains, the epoxy will not bond, so be patient and re-test every few days in warm, low humidity conditions.
Fill each cavity with a thickened epoxy fairing compound, using a squeegee to overfill slightly, then sand flush with 80 grit once cured. Apply two coats of barrier coat, allowing full cure between coats, then finish with your chosen antifouling paint.
For deeper blisters, consider a peel ply or vacuum bagging setup to extract moisture faster, a trick pros use for osmotic repair. Always check the manufacturer’s technical data sheet for the exact overcoat window, as skipping this ruins the job.
What Is the Best Paint for Aluminum Boat Hulls?
The best paint for aluminum boat hulls is a vinyl-based antifouling paint applied over a dedicated aluminum etching primer. This specific combination ensures the paint bonds mechanically and chemically to the metal, preventing adhesion failure.
Skipping the etching primer invites galvanic corrosion, so always sand the bare hull with 80 grit first. After priming, apply two coats of a barrier coat, like an epoxy tie-coat, to seal out moisture before your topcoat.
Check the paint label for “for aluminum” approval, as copper-based antifouling will destroy the hull quickly. Use a vinyl or modified epoxy topcoat for saltwater, and allow at least 24 hours drying between each coat.
One concrete tip: test your primer on a small patch, let it dry for two hours, then apply tape. If the tape pulls it up, the surface wasn’t clean enough, so wipe with acetone and recoat.
Do I Need to Sand Between Coats of Bottom Paint?
Usually not, though you may need to if you’ve blown past the manufacturer’s recoat window. Check the cure time on the can; if it’s exceeded, scuff the surface with 80 grit sandpaper or a red Scotch-Brite pad to guarantee adhesion.
If you’re within the specified timeframe, just apply the next coat directly, no sanding needed. For a typical ablative bottom paint, you’re safe to recoat within 4 to 6 hours at 70°F, but humidity and thickness matter.
Aim for two to three coats total, and test adhesion by pressing a thumbnail into the dried film. If it’s glossy and slick, sand lightly; if it’s still slightly tacky, you’re fine.
Remember that surface prep beats extra coats every time, and a quick pass with 120 grit on a long pole sander will fix any doubt before you roll on the final layer.
Can I Use a Regular Paint Roller for Bottom Paint?
No, you should not use a regular paint roller for bottom paint, as household rollers soften and disintegrate under the harsh solvents and biocides found in antifouling coatings. A standard roller will quickly break down, leaving lint and foam chunks in your finish, which ruins both the look and the protection.
For the job, grab solvent-resistant covers, often labeled as “epoxy” or “phenolic” rollers. These are designed to handle heavy chemicals without breaking down mid-stroke, so your work stays smooth and consistent.
A concrete tip: use a 3/8 inch nap for smooth hulls, and apply two thin coats rather than one thick one. This reduces runs and ensures even coverage. Look up “antifouling paint application” if you need more guidance. Trust me, your hull is worth the right tool.
Rounding Up
Apply boat hull paints by prepping hard, stirring well, rolling on thick coats, and respecting dry time. You will mess up a roller cover and smell like solvent, but you will save a boatload versus a yard doing it.
Check your paint can’s dry time and stick to it, even when you want to rush. Compare one coat for calm lakes against two for saltwater before you start. Write down your hull type and water conditions to pick the right number of coats.
Pay the $40 for good paint, because your hull and your back will thank you. Roll the paint on thick, but don’t overwork it, and let each layer cure fully.
Next, read about antifouling paint selection for your local waters.