What Are Raw Linseed Oils? Types, Uses and How to Choose
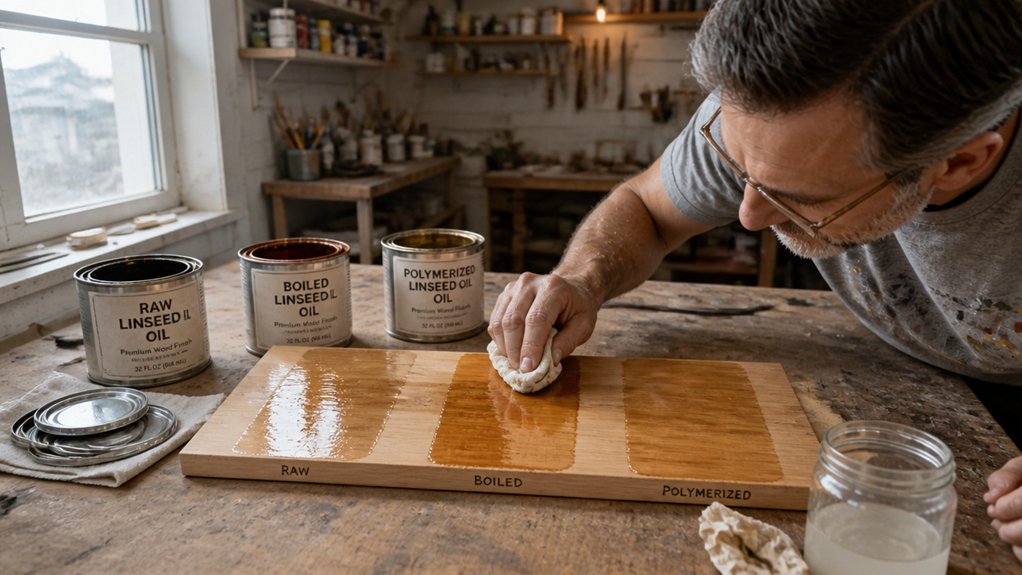
If bare wood looks dry and dull, raw linseed oil may help, but what are raw linseed oils?
Types, uses and how to choose one all matter for your project.
This guide covers the practical differences so you pick the right finish.
You will see why cold pressed oil suits furniture, when polymerized oil helps cutting boards, and how boiled oil speeds drying time on trim.
Surface prep still counts, so apply thin coats and wipe off excess before cure time.
Skip it on painted wood or in humid weather, and read on for simple finish choices.
Quick Answer
- Raw linseed oil is unprocessed flaxseed oil that penetrates bare wood for internal waterproofing without a topcoat.
- Types include raw, boiled, stand, cold-pressed, and polymerized oils, each differing in drying time and finish sheen.
- Best uses: priming bare wood, fortifying oil-based paint, and treating decks or tool handles with thin coats.
- Apply only to stripped wood, in thin coats, wiping excess before tacky to prevent soft under-layers.
- Choose cold-pressed or polymerized oil for low mildew risk and food-contact safety; check VOC labels.
What Is Raw Linseed Oil and Why Choose It?
Raw linseed oil is a slow drying, unprocessed oil made from flax seed. Buy cold pressed oil that has been purified or degummed, and check the label for VOC content. Third-party certifications like USDA Organic and Non-GMO can further verify that the oil is pure and additive-free. Warm pressed oil from hardware stores can leave proteins that feed mold. Purified versions cost more, but they give you a cleaner finish.
Raw linseed oil soaks into bare, weathered wood and helps the wood resist water from the inside. It does not build a topcoat like varnish or polyurethane, and it will not give you a gloss, satin, or matte sheen.
Raw linseed oil works into bare, weathered wood for internal water resistance, without building a topcoat or adding sheen.
Sand bare wood with 80 to 120 grit, wipe off the dust, and set out a drop cloth. Use painter’s tape on nearby trim and keep stain, primer, and paint off the wood you plan to oil.
Thin the first coat 2:1 with mineral spirits so it soaks in, then work in small sections and keep a wet edge to avoid lap marks and heavy brush strokes. Plan for a long drying time, and wait several days before you judge cure time.
Skip wood with existing paint, varnish, or polyurethane unless you strip it first. A thin coat on bare wood is the safe place to start.
Raw vs. Boiled vs. Stand Oil: Which Linseed Oil Type Do You Need?
Raw linseed oil soaks deep into bare wood and gives you extra open time before a topcoat. Its drying time is slow, and mildew can be a problem in damp climates, so use it on wood you can protect from moisture.
Boiled linseed oil has driers added, so it dries faster and works well on trim and furniture. Check the label to confirm the oil is actually boiled before you buy it.
Stand oil is heated in a vacuum and forms a tough, elastic film that resists yellowing. It takes a long time to set, so save it for a finish you can leave alone.
Before you start, set a drop cloth and painter’s tape to protect the floor and edges. Sand bare wood with 120 grit so the first coat can soak in evenly.
Raw oil can deepen the wood without a stain, but it will amber over time. Use a brush and keep a wet edge to avoid lap marks and heavy brush strokes.
Boiled oil is the usual pick for trim and furniture because it dries in about a day. Seal the can tight for better shelf life stability, and work with ventilation because added driers can raise VOC levels. Metallic dryers like cobalt or manganese are toxic when inhaled, so choosing a pure or chemical-free label reduces that exposure.
Stand oil can build a matte, satin, or gloss sheen on a topcoat, but it stays tacky long enough to collect dust. Test a small area first if you plan to use varnish or polyurethane over it.
If you plan to paint the wood, use a primer made for the paint and let it cure fully. Drying time is when the film feels dry; cure time is when it hardens all the way through.
How to Choose Raw Linseed Oil: Cold-Pressed or Warm-Pressed?
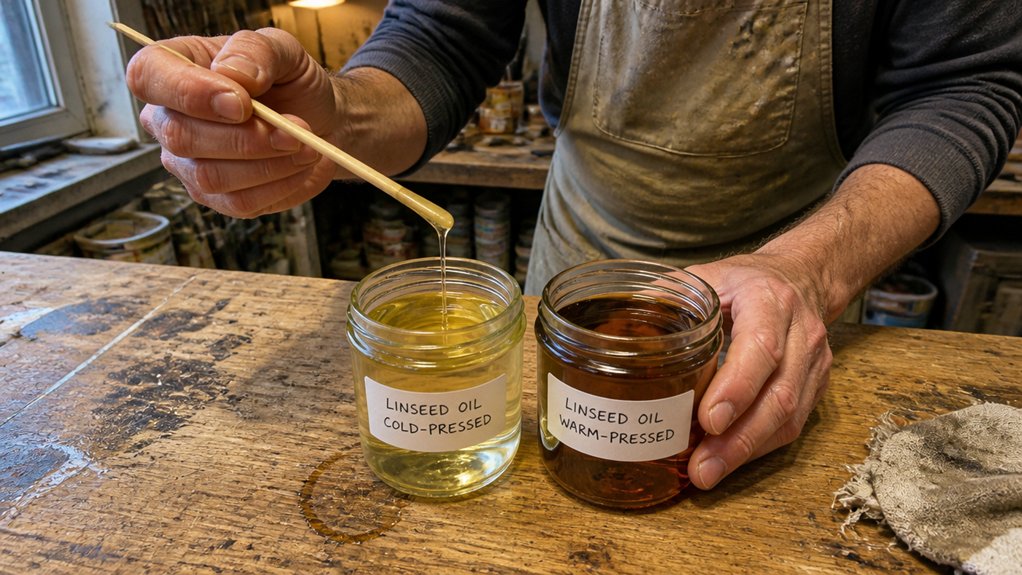
For raw linseed oil, choose oil made by cold pressing from a supplier you trust. It costs more, but it usually has fewer impurities that can feed mold when the oil sits in a wood finish.
If you buy warm pressed oil from a hardware store, check the label and test it on scrap wood. Some cheap jugs can leave a sticky film, and that film may hold dirt and moisture long after the surface feels dry.
If you plan to stain the wood, test the oil on a scrap piece first because oil can block stain from soaking in evenly. Raw linseed oil needs time to cure, so plan around drying time and cure time before you add a topcoat.
Sand bare wood with the right sanding grit, wipe off the dust, and lay down a drop cloth before you start. Apply thin coats with a brush and keep a wet edge to reduce lap marks and heavy brush strokes.
Use painter’s tape where you need a clean line, and let each coat cure before you cover it with varnish or polyurethane. Pick a topcoat sheen such as satin, gloss, or matte, and check the VOC level if indoor air matters to you. Low-VOC oils stay at 100 g/L and comply with California AQMD regulations for safer indoor application.
Cold-Pressed Quality Advantage
Two things decide whether you should buy cold pressed or warm pressed raw linseed oil: purity and how much mold your project can tolerate. For wood finishes I care about, cold pressed oil is the better choice on both counts.
Cold pressing gives a lower yield, but the oil stays thick and buttery with its natural components intact. The seed matters too, because cold pressers often start with clean flax seed selected for quality.
The press temperature stays low, which helps keep nutrients in the oil and keeps proteins out. Those proteins feed mildew, so this difference matters on a deck or any wood that sees moisture.
Warm pressed oil looks cheaper at first, but mildew patches can cost you more later. I learned that lesson the hard way on outdoor wood.
For furniture, cutting boards, or any wood you will see every day, buy cold pressed raw oil that has been purified. It costs a few bucks more, and your nose and your wood will thank you.
When you use the oil as a topcoat, you can build a warm satin or matte sheen and skip the high gloss of a film finish. Check the label for VOC content and any added solvents before you buy. Raw linseed oil requires 2–4 days of drying time for full cure, so plan your project timeline accordingly.
Sand to the sanding grit that fits your project, then wipe off the dust and lay a drop cloth. Use painter’s tape on edges you want to keep clean.
Thin coats help you keep a wet edge and avoid lap marks and heavy brush strokes. Watch drying time and cure time, because raw oil can feel dry before it has fully cured.
If you plan to stain the wood, test the stain first and let it dry before you apply oil. Use a primer and paint when you want a painted surface, and use varnish or polyurethane when you want a strong film finish.
Warm-Pressed Impurity Risks
Warm pressed linseed oil can save you money, but it brings proteins and plant gums into the wood. Those impurities feed mold, so a finish that should protect wood can turn sticky and mildewed.
Warm pressing pulls more oil from the seed, and it also slows drying time. Drying time and cure time are different, so give the oil the full cure time before you apply a varnish or polyurethane topcoat.
Cold pressed, purified linseed oil skips those impurities, so pay the few extra dollars per quart. Spread a drop cloth, tape edges with painter’s tape, and sand to the sanding grit your finish maker recommends before you start.
On a stain or bare wood project, keep a wet edge and work in a small area to reduce lap marks and brush strokes. Test the clear topcoat on a scrap piece and check the sheen you want: gloss, satin, or matte. Polymerized linseed oil dries harder and faster than raw alternatives, making it a safer choice for food-contact surfaces like cutting boards.
If you plan to cover the wood with primer and paint, use the same prep and let each coat dry fully. Choose a low VOC finish when shop fumes matter, and follow the label for recoat and cure time.
Top Uses for Raw Linseed Oil: Wood Treatment, Priming, and Paint Fortifier
Raw linseed oil works best when it soaks into wood fibers and protects from inside the wood. It hardens slowly to a matte or satin sheen, and it gives good results on bare wood when you prepare the surface and control drying time.
Wood treatment is the first job: apply thin coats to decks or tool handles, let each coat soak in, and wipe off the excess before it gets tacky. The oil helps the wood resist water and leaves a low gloss finish that feels smooth under your hand.
Priming is the second job: sand the bare wood with the right sanding grit, brush on a thin coat as a primer, and let it cure before the topcoat. This seals the pores and helps prevent blotchy stain later, especially when you keep a wet edge and avoid lap marks.
Paint fortifier is the third job: stir a small amount into paint that has an oil base to improve flow and durability, and watch for better resistance to dust. Test the mix on scrap first, because adding oil can change gloss, drying time, and cure time, and check the VOC label before you add it to paint, varnish, or polyurethane indoors, as most jurisdictions cap residential stain VOCs at 100 g/L.
You can tint raw linseed oil with pigments for custom tinting recipes, and use painter’s tape and a drop cloth to keep the work clean. Choose purified raw oil, stir it well, and apply it with steady brush strokes so the finish looks even.
Why Raw Linseed Oil Dries Slowly: and How to Apply Thin Coats
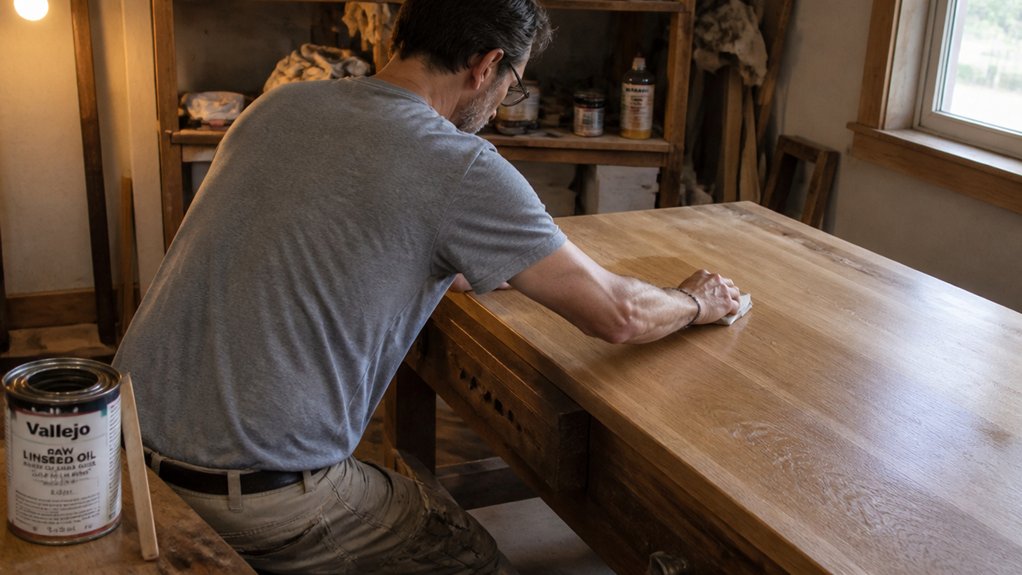
Raw linseed oil dries slowly because it needs oxygen to turn from liquid oil into a solid film. Without added driers, that reaction takes a long time, so drying time can run for days and cure time can take weeks.
Brush on thin coats and let each one sit so oxygen can reach the oil and the film can set. A thick coat can skin over on top and stay soft underneath, which leads to poor adhesion for a later varnish or polyurethane topcoat.
Keep a wet edge as you work to avoid lap marks and heavy brush strokes, which can show through a satin or matte sheen. Let each coat dry before you sand lightly with 220 grit, wipe off the dust, and apply the next coat or a varnish topcoat. For the topcoat stage, choose a water-based varnish with UV inhibitors if the piece will be exposed to sunlight.
Drying Chemistry Explained
Apply oil based stains, varnishes, and polyurethanes in thin coats so oxygen can reach the film and cure it evenly. Oxygen in the air reacts with the oil and starts the cure.
The reaction creates reactive fragments that join nearby oil chains into a larger network. As that network grows, the film gets tougher and more solid.
Thin coats let oxygen reach the whole film, so the finish hardens from the surface down. Thick coats shut off oxygen before the lower part of the film can cure.
The surface can skin over while the inside stays soft, which leaves a gummy finish and wrinkles. Keep your coats thin and watch drying time and cure time.
The surface may feel dry long before the film has fully hardened, so give it time before sanding or adding the next coat. Sand between coats with the right sanding grit to knock down nibs and give the next coat something to grip.
Work with a wet edge and light brush strokes to reduce lap marks. Set a drop cloth and use painter’s tape before you open the can.
On painted work, keep primer and topcoat thin so the film cures evenly. Sheen, gloss, satin, and matte finishes depend on a clean, even film.
A low VOC finish still needs oxygen and thin coats, so read the label and follow the recoat time. Give each coat time to set before you add another. Most water-based eggshells emit the majority of their emissions within the first day, so ventilating the room during that window helps the curing film stay clean and even.
Thin Layer Application Methods
Raw linseed oil has a long drying time because its small molecules crosslink slowly into a film. You get better results when you apply it in thin coats and let each coat soak in fully.
Thick coats can skin over and trap oil below the surface, which leads to wrinkles as the film forms. Brush on a thin coat, work with the grain, and keep your brush strokes even to avoid lap marks.
Let the oil soak in, then wipe off any excess with a rag before it gets tacky. Wait 24 to 48 hours before the next coat, and sand lightly with 220 grit if the surface feels rough.
Drying time is when the oil stops feeling wet, while cure time is when the film has hardened enough to accept a topcoat. If you plan to use a varnish or polyurethane topcoat, let the oil cure fully first.
Repeat this process for up to three coats, and check that each coat is fully absorbed before you add more. This gives a more even cure and reduces the chance of a sticky film or gummy buildup.
Raw linseed oil leaves a low sheen that suits a matte or satin look better than a high gloss finish. Test on a scrap board first, and use a drop cloth and painter’s tape to protect the work area.
Check the product label for VOC content and follow the safe use instructions. Use raw linseed oil as a penetrating oil treatment, and choose a separate varnish or polyurethane topcoat if you need more protection.
For even application on larger surfaces, consider using a seam roller to press down overlapping edges and ensure the oil penetrates uniformly without leaving raised ridges.
Do Proteins in Raw Linseed Oil Attract Mold and Mildew?
Raw linseed oil can attract mold and mildew when it still contains proteins. Those proteins feed spores, and damp conditions let black spots and fuzzy growth take hold.
This problem usually comes from cheap warm pressed oil sold at the hardware store. It leaves sticky residue that holds moisture, and that moisture helps proteins break down into nitrogen compounds mold can use.
Oil purification is the fix because proper degumming removes the protein rich material before the oil is sold. Ask for a purified linseed oil product, check the label, and test a small area before you coat the whole project.
If you are finishing wood, choose the right sanding grit, clean off dust, and use a primer if the project needs one. Lay a drop cloth and apply painter’s tape to protect nearby areas, then brush on a thin coat and keep a wet edge to avoid lap marks and heavy brush strokes.
For a topcoat over stain, varnish, or polyurethane, let each coat dry within the listed drying time and allow full cure time before you call the job done. Check the sheen you want, whether gloss, satin, or matte, and pick a low VOC product if fumes are a concern.
If you need a preventive barrier after finishing, a quaternary ammonium spray like MOLD ARMOR Mold Blocker can help stop regrowth on nearby surfaces for up to three months.
When to Skip Raw Linseed Oil: Climate Limits and Existing Paint Layers
Skip raw linseed oil when the site is humid or the wood already has paint or a clear finish. Above 75% relative humidity, drying time stretches out, the surface stays tacky, and mold can take hold.
Raw oil cannot soak into painted or sealed wood, so it leaves a blotchy film that may peel later. Varnish and polyurethane block absorption the same way, and sanding cannot remove a sealed finish.
Surface prep still matters on bare wood, so sand with 120 grit and wipe off the dust before you start. If you must coat painted wood, apply a primer made for oil paint and let it cure before the topcoat.
Bare wood in a dry desert climate is the right place for raw linseed oil, and a matte sheen is normal for an oiled surface. Apply thin coats with a brush, keep a wet edge, and watch for brush strokes and lap marks.
Use a drop cloth and painter’s tape to protect nearby areas while the oil dries. If the wood needs a color change, use a stain first and let it dry fully before you oil.
In a rainy season, wait for a stretch of dry weather so moisture does not trap the oil. Check the forecast and give the oil enough drying time before you walk on the wood or add another coat.
VOC levels vary by product, so read the label and work with ventilation. If the wood is painted or sealed, choose a primer and topcoat that match the existing finish.
Safe Application Tips for Raw Linseed Oil on Furniture and Antiques
Raw linseed oil on furniture and antiques needs thin coats and long waits. Start with a clean surface, lay down a drop cloth, and tape off areas you want to protect with painter’s tape.
Raw oil has a slow drying time, and the cure time can run for weeks. Plan your work around that schedule so you do not handle the piece too soon.
Apply a very thin layer with a clean cloth that does not shed lint, and wipe with the grain to keep lap marks out of the finish. Work small sections so you keep a wet edge, and use the cloth to avoid brush strokes.
Buff off the excess after about 15 minutes so the surface does not turn sticky. If the wood feels rough, sand lightly with 220 grit sandpaper before the next coat.
Wait about three days between coats and keep the piece in a warm, dry room near 70°F. Raw linseed oil gives a soft sheen with low gloss, close to a matte or satin look depending on how much you buff.
It has a lower VOC level than many varnish or polyurethane topcoats, but test any stain, primer, or topcoat on a hidden spot first. Keep the cloth folded and turn it as you work so the finish stays even.
Frequently Asked Questions
Can Raw Linseed Oil Be Used on Food-Contact Surfaces?
Raw linseed oil can be used on food-contact surfaces only when it is purified and cold pressed, and I still prefer a dedicated food-grade finish for the job. The cured film is generally regarded as safe, but food safety rules rightly demand caution with any drying oil.
For a practical bench test, sand bare wood to 220 grit, apply a very thin coat, wipe off all excess, and let it cure 7 to 14 days before use. If you need a faster, more predictable result, look for a food-safe wood finish such as a polymerized oil or salad bowl finish.
Does Raw Linseed Oil Expire or Go Rancid Over Time?
Raw linseed oil does expire and can go rancid over time. Once it turns sharp, tacky, or thick, stop using it on fine furniture because it may never cure hard.
Store it cool, dark, and sealed tight, and date the container so you know its age. Before applying it, test a thin coat on scrap wood and allow 24 hours; if it stays sticky, the oil is past its useful life.
For a practical benchmark, wipe on one thin coat, let it soak 15 minutes, then buff off all excess. If you need faster drying, compare raw linseed oil with boiled linseed oil, but never mix rags into a pile.
How Do You Clean Brushes Used With Raw Linseed Oil?
To clean brushes used with raw linseed oil, wipe off excess oil, rinse them in mineral spirits, then wash with a degreasing soap. Work the solvent well into the heel and bristles, not just the tips, because raw oil collects there.
Collect the dirty solvent in a sealed jar and let solids settle before pouring off the clear liquid for reuse. A practical tip is to comb the washed bristles straight with a brush comb, then hang the brush bristles down to dry.
For solvent disposal, keep the jar labeled and take it to your local household hazardous waste site. Finish with a warm degreasing soap wash to remove residue completely, then rinse until the water runs clear.
Can Raw Linseed Oil Be Applied Over a Previous Oil Finish?
Yes, raw linseed oil can be applied over a previous oil finish, but sand the surface first so the new coat can bond. Without that prep, adhesion suffers and you risk a brittle layered coating that peels.
Use 220-grit paper to dull the old film and remove any glossy or contaminated spots. Then apply thin coats and let each one absorb fully before adding the next.
For a practical schedule, brush on a thin coat, wait about 24 hours, and wipe off any excess oil that has not soaked in. Three or four thin coats usually build a more durable finish than one heavy application, especially when refreshing an oil-based finish.
Is Raw Linseed Oil Safe to Use Indoors During Application?
Raw linseed oil is safe to use indoors during application if you provide strong ventilation and keep the area aired.
Open windows wide and use a box fan pulling air out of the room. Treat linseed oil safety as an airflow problem first, because the slow dry and heavy oily smell need fresh air moving through.
Apply a thin coat with a brush or rag, then wipe off any excess after 15 to 20 minutes. This helps it dry faster and avoids a sticky film; expect roughly 24 to 72 hours between coats depending on humidity.
Keep the space ventilated until the smell fades, and spread oily rags flat outside to dry safely before disposal.
Rounding Up
Raw linseed oil is a slow, certain finish for bare interior wood, priming thirsty surfaces, and fortifying paint. Check whether your wood is bare and interior, then skip it outdoors or over old coatings.
Write down whether the job is priming, paint fortifying, or a finish, then compare a cold-pressed jug before buying and brush on whisper-thin coats. Grab a cold-pressed jug around $15 a quart, which measures price per quart, and treat patience as the whole game: you get a soft sheen, not a bulletproof shield.
Read next: Priming thirsty surfaces.