What Are Water-Based Wood Dyes? Types, Uses and How to Choose
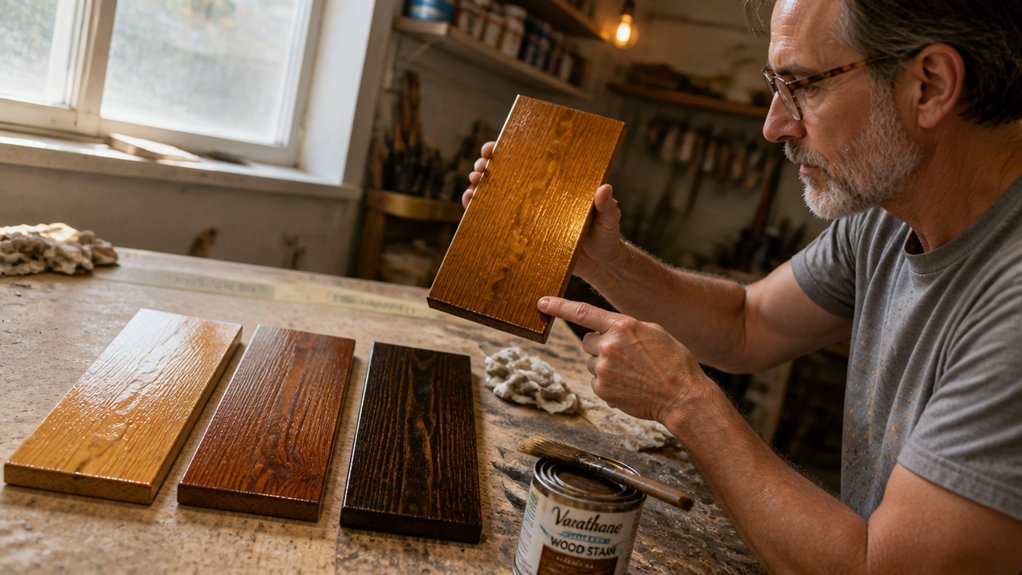
If your wood dye job looks muddy or the grain disappears, the product may not be the problem. Water-based wood dyes are translucent colorants that soak into fibers so figure stays crisp, and this guide covers types, uses, and how to choose.
You will see the difference between powder and liquid concentrate, plus why surface prep and raised grain matter. Always test on scrap before committing to a color, then plan your topcoat so the sheen and color come back to life.
Keep reading for the practical steps, small batch tips, and common mistakes to avoid.
Quick Answer
- Water-based dyes penetrate wood fibers, preserving grain and figure unlike surface-level pigmented stains.
- Available as powder or liquid concentrate; powder offers cost savings, liquid provides convenient measuring.
- Use for custom staining, tinting varnish, or polyurethane; verify label compatibility before mixing.
- Apply thin, wet-edge coats in small sections; manage raised grain by sanding with 220 grit.
- Test shades on scrap wood with identical prep, topcoat, and sheen to predict final color accurately.
What Exactly Are Water-Based Wood Dyes?
Water based wood dye is a solution of colorant in water. It soaks into wood fibers and leaves the grain visible, while a pigmented stain sits more on the surface and can hide some grain.
Water based dye soaks into wood fibers and keeps grain visible, while pigmented stain sits on the surface and can hide it.
For figured maple, I reach for water based dye when I want clear color. The figure stays crisp because the color lives inside the wood.
Penetration runs deep, so light sanding with 220 grit will not remove all the color. That depth gives you room to fix small surface defects before the topcoat goes on.
Drying time is slower than with spirit based dye. That slower dry gives you a longer wet edge, which helps you blend edges and avoid lap marks on a large tabletop.
Dry dye can look flat and chalky before the topcoat. That flat look is normal, and the color comes back once you apply a clear polyurethane or varnish with the gloss, satin, or matte sheen you want. Humidity between 30–50% ensures optimal drying speed, while a temperature around 70°F is ideal for curing.
Apply a thin coat with a brush and keep your brush strokes moving along the grain. Let each coat dry fully before you sand lightly and add the next coat.
Most water based dyes have low VOC content and clean up with water before the film cures. Tape off areas with painter’s tape and use a drop cloth, then check the drying time and cure time on the label before you sand or recoat.
Powder vs. Liquid: Which Form Should You Buy for Water-Based Dye?
I buy powder for water based dye because it gives me the most control when I mix a custom shade. I can tweak the concentration gram by gram, test a small batch on scrap wood, and check the color under a satin or matte topcoat without committing to a full bottle.
Liquid concentrate is handy for a quick batch, but the jug takes shelf space and can dry out between jobs. Powder takes less room, and I can mix only what I need for a stain, varnish, or polyurethane job.
Prep matters as much as the dye. Sand to your final grit, wipe off the dust, lay a drop cloth, and pull a clean line with painter’s tape before you mix.
Mix a small test batch and check it on scrap under the same light as the finish. Let it dry fully, then apply your primer or topcoat and watch for lap marks, brush strokes, and a wet edge as you work. Water-based dyes typically dry fast with low odor, making them suitable for both indoor and outdoor wood projects.
Check the label for drying time and cure time before you recoat. Pick a low VOC product if fumes matter in your shop.
Powdered Dye Benefits
A bucket holding five gallons of liquid dye feels heavy, but most of that weight is water you pay to ship. Powdered dye gives you pure pigment in a small jar, and I have switched most of my work to it.
My wallet likes the change. You will need a scale and hot water, which is a small cost.
Powder stays potent for years, while liquid dye can settle or grow mold. Powder costs about 30 percent less per mixed gallon, and you mix only what you need.
It has no preservatives or stabilizers to alter the color. A jar stores flat in a drawer and does not take up shelf space.
You control strength by weight, so you can match a stain or a topcoat color from batch to batch. I keep a drop cloth and painter’s tape on hand when I mix a batch.
I label each jar with the recipe and test the color on scrap wood before I apply the finish. When I brush a topcoat over a stain, I keep a wet edge and watch for lap marks and brush strokes.
For a topcoat, I want the same sheen, whether that is gloss, satin, or matte. I also watch drying time versus cure time so the finish can take sanding with the right grit.
If the job calls for primer, polyurethane, or varnish, I write down the mix and check the VOC label when fumes matter. Low-odor mineral spirits can also help clean brushes and thin oil-based finishes without muddying pigment. Powdered dye helps when you need repeatable color and less waste.
Try powder on your next stain or topcoat batch and keep notes on your mixes. You will carry less weight and spend less per mixed gallon.
Liquid Concentrate Convenience
I keep two quarts of liquid concentrate on my shelf beside my powder dyes. It earns its place because I can measure it exactly and skip the dust.
I draw 10 milliliters with a measuring syringe and mix it into water for a small batch. There is no scale, no dusty spoon, and no guesswork before I wipe on a stain or dye.
Storage is easier with liquid concentrate. A sealed bottle stays uniform for months, and a quick shake brings it back after it sits.
Powdered dye can clump when damp air gets into the bag, and those clumps can leave specks under a topcoat. A sealed bottle of concentrate avoids that trouble and keeps my mix repeatable.
Dilution is simple. I mix strong for a deep walnut or thin it for a light amber, and each batch comes out close to the last.
For small jobs, liquid is ready to pour and easy to control with a syringe. Powder still costs less per ounce, but extra measuring and cleanup take time on a repair or a sample board. Higher concentrations evaporate faster, so keep the bottle capped between uses to prevent the mix from thickening.
Before I apply stain or dye, I sand to the grit the finish maker recommends and wipe off the dust. A drop cloth and painter’s tape keep the work area clean, and a test board shows the color before I commit.
On larger panels, I work to a wet edge and watch for lap marks. I use a brush or rag that suits the product, and I keep brush strokes light so the color lays down even.
A varnish or polyurethane topcoat can change how the color reads, so I check the sheen on a test piece, whether gloss, satin, or matte. I also follow the drying time and cure time on the label, check the VOC level if I work indoors, and use a primer when the project needs one.
For a small project, keep one concentrate on hand. It saves cleanup from dye dust, and you can mix a repeatable batch when you need it.
Mixing Custom Shades
Mixing custom shades is where water based dye works well, and the powder or liquid choice changes how much control you get. Powder gives you precise control, while liquid is faster and easier to handle.
For custom color matching, weigh powder in small increments and dissolve it fully before you add more. That slow step gives you repeatable color and avoids a heavy dose that pushes the shade too far.
Liquid dye works for tinting primer or a topcoat when you need a quick batch. Add it a little at a time and stir well, because liquid can over saturate a batch fast. To prevent uneven streaks in thin liquids, use a helix mixer paddle that reduces bubbles while blending.
Powder keeps for decades when it stays dry, so it is a good choice for occasional mixing. Liquid costs more per usable gallon, and its shelf life is shorter once opened.
Test every mix on a scrap board prepped with the same primer and sanding grit you plan to use. Let it dry and check the sheen under your shop light, whether you want gloss, satin, or matte.
Check the VOC rating if fumes matter in your shop. For a topcoat, apply a thin coat with steady brush strokes and keep a wet edge to avoid lap marks.
Respect the drying time and cure time on the label. Use painter’s tape and a drop cloth to protect the work area.
I use powder for stain, varnish, and polyurethane color work when I need a close match. For quick tinting on a small batch, liquid is the faster tool.
How to Apply Water-Based Dye Without Streaks or Lap Marks
Dye can dry into lap marks if you let the surface dry between passes. Keep a wet edge on each section until you finish it.
Work in small sections, about two square feet at a time. Flood the dye with a foam brush, then wipe off the excess before it dries.
Plan your path before you start so you do not stop in the middle of a panel. Overlap your brush strokes into the still wet edge, and move left to right, top to bottom.
A dresser drawer face takes about ninety seconds. If you see a dry spot, wet it again with a damp cloth and blend it at once.
Set up your drop cloth and painter’s tape before you mix the dye. Sand to your final sanding grit and remove the dust so the dye takes evenly.
Water based dye can sit under stain, varnish, or polyurethane, but check the product label first. Follow the drying time on the label, and allow more cure time before you use the piece.
Water-based dye works under stain, varnish, or polyurethane—just verify the label and respect its drying time.
After the dye is dry, apply a topcoat to protect the color. Choose a sheen such as gloss, satin, or matte to match the look you want.
Check the VOC level and the label directions if fumes matter. Keep the room ventilated while you work, and let each layer dry as directed.
Curing in high humidity over 70% requires an overnight extended wait before applying any subsequent finish layers.
Why Water-Based Dye Raises the Grain: and How to Handle It

Waterborne dye raises the grain as soon as it touches bare wood. Water gets into the wood fibers and makes them stand up, so the surface feels fuzzy.
You can manage this before the dye goes on. Wipe the bare wood with clean water, let it dry, then sand lightly with 220 grit paper.
This step knocks down the first set of fibers. After sanding, remove the dust with a vacuum and a tack cloth so the dye can soak in evenly.
Apply the dye with a foam brush and keep the coat even. Less rubbing means fewer fibers lift, and you avoid lap marks and heavy brush strokes.
Once the dye dries, seal it with a thin coat of shellac or sanding sealer. Sand that sealer lightly between coats, and keep the sandpaper off the dye so you do not scrub away color. Anti-clog coatings on the sandpaper can help prevent buildup on the sealer and filler as you work.
Check the drying time on the sealer before you sand, and let it cure before you add a topcoat. A satin or matte topcoat, such as polyurethane or varnish, will protect the color, and a gloss topcoat will show every bit of grain and dust.
Expect some fuzz because the dye is soaking in deep. Prep the wood well, use a drop cloth and painter’s tape for a clean workspace, and you will get smooth, rich color.
Which Wood Species Work Best With Water-Based Dye?
Water based dye looks best on woods with open grain, and oak and ash are my first picks. The dissolved color sinks into the pores and rings, so the grain shows up clearly after you sand to 150 or 180 grit.
Maple and cherry also take water based dye well because their tight grain lets the color sit evenly across the surface. You get a clear, even tone that still lets the wood figure show through.
Sanding matters more than species in many cases, so finish with a grit that leaves the surface flat and consistent. Wipe off dust, then apply the dye in small sections and keep a wet edge so you avoid lap marks.
Let the dye dry fully before you add a topcoat, and check the manufacturer’s drying time and cure time. A water based polyurethane in matte or satin sheen keeps the grain visible, and a low VOC product helps if you work indoors. Water-based stains with low VOCs under 50 g/L dry faster and reduce strong odors indoors.
Grain Visibility and Depth
Clarity matters most with water based dyes. It explains why some woods look bright and others look flat.
Maple, birch, and poplar have tight, even grain that takes dye well. Their grain holds the water soluble color and gives a crisp look with depth.
Curly maple shows strong chatoyance, the shifting light pattern in the grain. Birdseye maple shows every tiny knot.
Cherry builds warm, even color without muddiness. Poplar takes dye predictably and hides its green streaks.
Birch gives a look close to maple at a lower price. These woods keep the figure visible under the color.
To amplify the grain pattern, keep the wood figure clear. For depth, use dye.
Pigment stain can sit on the surface and bury the figure. Dye adds color while the grain still reads.
Save primer for painted projects where you want an opaque coat. Dye work needs bare wood so the grain shows.
Before you dye a full panel, test on scrap. Sand to your final grit, raise the grain, and let the wood dry fully.
Apply the dye with a brush or sponge and keep a wet edge. Work in one direction to limit brush strokes and lap marks.
Check the dye’s drying time before you topcoat. Respect the cure time before you handle or sand the finish.
Choose a clear topcoat such as varnish or polyurethane. A low VOC water based topcoat keeps the shop comfortable.
Pick gloss for maximum chatoyance. Use satin or matte when you want a softer sheen.
Use a drop cloth and painter’s tape to protect the floor and edges. Test the whole schedule on scrap first, then dye the piece with confidence.
For maximum depth and clarity, remember that chip-resistant and fade-resistant formulas protect the dyed finish against wear over time.
Dense-Species Compatibility
Dense woods can take waterborne dye well, but the species makes a big difference. The dye needs to soak in evenly so the color looks smooth and the finish can grip.
Maple has a tight grain that takes dye evenly and gives strong color. Its dye penetration is deep, and the finish adhesion is excellent.
Cherry absorbs dye at a moderate depth and holds a topcoat very well. Seal it first with a thin coat of sealer, then sand lightly with 320 grit before you apply the dye.
Walnut has natural oils that can block dye, so pick another wood for a simple dye job. Oak has open pores that can take dye unevenly, so use a gel stain there if you want even color.
Dye penetration depth affects how well the topcoat sticks. If the dye does not sink in enough, the topcoat can peel or flake.
Before you start, lay a drop cloth and use painter’s tape to protect nearby surfaces. Sand the wood to 180 grit, then remove dust with a tack cloth.
Apply the dye in small sections and keep a wet edge to avoid lap marks. Use light brush strokes with the grain and check for sheen changes as the dye dries.
Choose a topcoat with the sheen you want, such as gloss, satin, or matte. Pick polyurethane or varnish for the final coat, and follow the label for drying time and cure time.
If the wood needs a primer, use one made for your topcoat. If you work indoors, choose a low VOC product and keep the room ventilated.
Test maple or cherry on scrap before you commit to the whole project. A scrap test shows how the dye takes and how the topcoat looks.
For species like cedar or redwood with a tight grain, a water-based sealer can help prevent uneven absorption before dyeing.
How to Choose Water-Based Dye: Test Boards, Color Mixing, and Finish
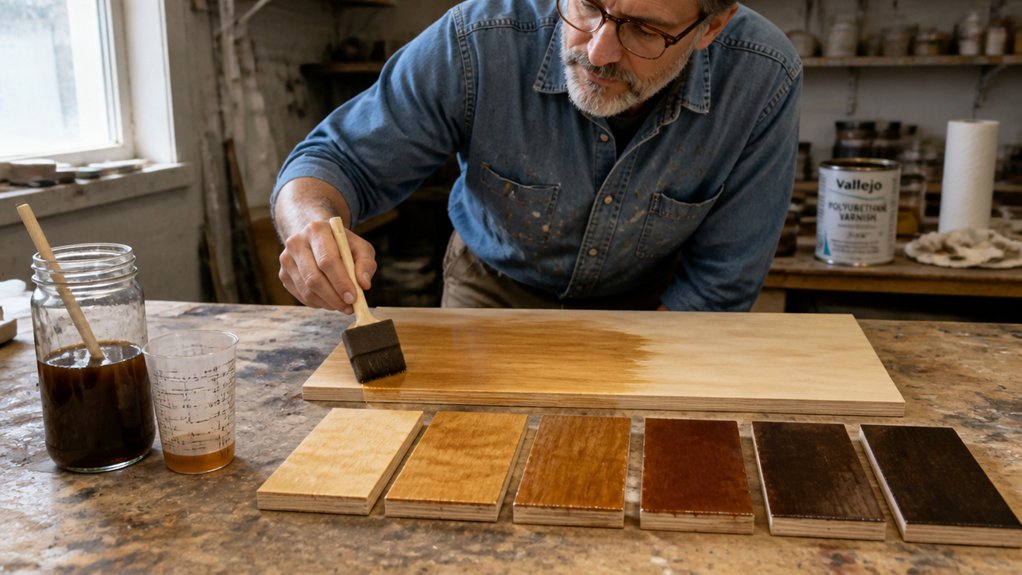
Choosing a water based dye starts on a scrap board. The can label helps, but the board shows the real color.
Cut several test pieces from the same wood and sand them with the same sanding grit sequence as your project. Apply the dye and the finish you plan to use so you can judge the final sheen, whether gloss, satin, or matte.
Test with the exact final topcoat because water based dye looks flat until it is sealed. If your project gets a primer, include that step on the test board too.
Mix colors slowly: start with a light base, add darker drops, and write down the ratios like a recipe. Check finish compatibility before you commit, since shellac and water based polyurethane usually work well.
Oil based varnish or stain may muddy the dye, so test a small area first. Read the VOC rating and the drying time and cure time on the label if fumes or schedule matter.
Apply two thin coats and let the first coat dry 30 minutes for depth without blotchiness. Keep a wet edge and use light brush strokes to avoid lap marks on larger pieces.
Label each sample with dye brand, dilution, coat count, and the topcoat used. Your future self will thank you when you need to repeat the color.
Dry dye lies about color, so do not panic in the middle of a project. Grab scrap wood, mix a bold test batch, and seal it before you judge the color.
Set out a drop cloth and painter’s tape so test boards stay clean and easy to handle. Test boards save heartache and give you a finish you can trust.
Frequently Asked Questions
Can I Use Water-Based Dye Over an Existing Finish?
You should not apply water-based dye over an existing finish. Water-based dye needs bare wood to penetrate, and a sealed or finished surface will cause adhesion failure and blotching instead of an even color.
Strip or sand the piece first, and use a 150 grit abrasive to remove the old coating and open the grain. Wipe off the dust, then run a small compatibility test on an inconspicuous area before you commit to the whole project.
If you are comparing this with water-based wood stain, treat it the same way: prep to bare wood and test first. That extra step saves you from a costly redo.
How Do I Clean Brushes After Using Water-Based Dye?
To clean brushes after using water-based dye, rinse them under warm water until the runoff clears, then work in soap for stubborn residue.
For dried dye, a short solvent dip breaks it down, and for caked-on buildup soak the bristles in white vinegar for 15 minutes before scrubbing gently.
Rinse again with warm water and massage the bristles with a mild brush soap to lift loosened pigment.
A related search term is water-based wood stain cleanup, since the same rinse and soap routine applies to many waterborne finishes.
Do not skip the final rinse, because leftover soap or vinegar can dull the next coat.
Shape the bristles and dry them flat for at least 12 hours.
Will Water-Based Dye Bleed Through Paint or Primer?
A water-based dye will not bleed through paint or primer when the wood is properly sealed. The dissolved colorant sinks deep into wood fibers, while paint pigments sit on the surface with larger particles.
That deep penetration locks the color in place, so the primer and topcoat stay clean. Always apply a seal coat before painting, and let a water-based sanding sealer dry at least 2 hours before sanding with 220 grit.
This step prevents any dye migration and gives the finish a uniform base. If you are searching for a wood dye primer solution, test a small hidden area first and use two thin coats of primer for extra insurance.
Can I Mix Water-Based Dye With Polyurethane?
No, you cannot mix water-based dye directly with polyurethane because the water and poly binder do not bond and can create clumps. For a reliable finish, tint the dye in a separate cup, apply it to bare wood, and let it dry fully, about 2 to 4 hours depending on humidity.
Pre-tinting polyurethane with dye risks uneven color and grain raising, especially on open-grain woods like oak. Seal the dried dye coat with two thin coats of polyurethane, sanding lightly with 320-grit between coats.
If you are searching for a waterborne dye alternative, keep the dye and finish as separate steps. This application order gives you clearer color control and a smoother topcoat.
Does Dye Color Fade Over Time in Sunlight?
Yes, dye color fades over time in sunlight because many dyes have lower UV resistance than pigments. For a wood finish you want to protect, apply a UV-blocking topcoat with at least two thin coats, letting each coat dry 2 to 4 hours before recoating.
That extra film helps slow color fade and supports pigment stability, though no clear finish stops sunlight completely. Check the label for lightfastness or UV protection, especially on exterior wood.
If you are working on a small test board, put it in direct sun for a week and compare it with a covered sample. Reapply your topcoat on the manufacturer’s schedule, usually every 1 to 2 years outdoors.
Rounding Up
Water-based wood dyes are your friend if you respect them: they are not magic, but close, and they work like a good multi-tool while giving crisp, even color that will not hide the wood’s chatoyance. Do a quick water pop and sanding to manage grain-raising before finish, because I have had my share of streaky messes when I rushed.
Buy the powder and test your boards first before you commit to a finish. Compare water-based dye with stain when you want crisp, even color that will not hide the wood’s chatoyance.
Next topic: water-based wood dye application.