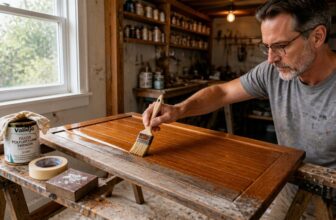
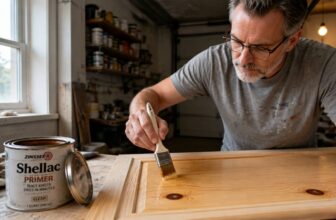
What Are Water-Based Varnishes? Types, Uses and How to Choose

Water-based varnishes give you a clear, non-yellowing finish, but choosing the right type takes a little know-how.
This guide covers what water-based varnishes are, their types, uses and how to choose.
You’ll see where polyurethane and acrylic lacquer fit, which surfaces to avoid, and how sheen, adhesion and stain ratings affect the result.
We’ll also cover surface prep, thin coats and sanding between coats so you get a finish that lasts.
Keep reading for the common mistakes to avoid before you start.
Quick Answer
- Water-based varnishes resist UV yellowing, keeping light woods like maple bright over time.
- Three types exist: polyurethane for durability, lacquer for crisp finish, blends for balanced use.
- Ideal indoors for furniture and cabinets, but poor in bathrooms due to steam damage.
- Choose by adhesion and stain ratings first, then compare sheen for desired look.
- Apply thin coats, sand between coats, and respect drying versus cure time.
Why Water-Based Varnish Stays Clear Longer

Water based varnish offers the clearest look for wood because of its chemistry. Oil based finishes suffer from UV degradation which breaks molecular bonds in the coat.
This degradation starts a yellowing process turning light wood like maple into amber over time. Water based resins like polyurethane or acrylic resist this coloring because they do not have the structures that absorb light.
You achieve a film that remains white for years even when exposed to sunlight. On a practical level I have seen single coat waterborne finishes on white oak maintain their brightness across multiple summers. Meanwhile oil based coatings quickly look like old lacquer.
This clarity is not just about how it looks but also how durable it is. When finishing a light coffee table or decorative trim, you want the wood grain to stand out without developing a honey colored cast.
Choose water based topcoats when clear and long term aesthetics are your main priority. Ensure you follow the manufacturer s recommended drying time before proceeding to the next coat or furniture placement. This approach delivers a true clean finish for any fine wood project. UV inhibitors are necessary for outdoor applications to prevent ghosting, ensuring the finish maintains its bright appearance in demanding environments.
3 Water-Based Varnish Types: Polyurethane, Lacquer, Blend
Waterborne varnish comes in three types: polyurethane, lacquer, and blends, and each one fits a different job.
Waterborne polyurethane is the toughest choice, and it resists scratches well on tabletops and floors.
Polyurethane forms a film as water evaporates and resin particles merge, so apply thin coats and sand between coats with 220 grit or finer.
Waterborne lacquer uses acrylic resin, dries fast, and builds thin layers for a crisp look.
Lacquer works well for furniture and cabinets, but it does not stand up to heavy wear as well as polyurethane.
Blends mix urethane with acrylic to balance durability and easy application, and some add a warm amber tone like an oil varnish.
For floors, choose polyurethane; for cabinets, a blend is easier to apply and still holds up well.
Choose gloss, satin, or matte sheen for the look you want, and use a good synthetic brush to reduce brush strokes.
Keep a wet edge to avoid lap marks, and use light brush strokes in one direction to level each pass.
Drying time tells you when you can recoat, and cure time tells you when the film has fully hardened, so check the label for both.
Lay a drop cloth and tape edges with painter’s tape, and ventilate the room because waterborne varnishes still have some VOC content.
For stained wood, apply the stain first, then use the varnish as a topcoat.
For cabinets, a stain or primer sets the color, and the varnish is the topcoat.
Test a small area first, and match the product to the surface and the wear it will face.
Water-based formulas can flex with about 5% expansion capacity, which prevents cracking and makes them a durable option for exterior projects.
Where Water-Based Varnish Works: Indoors vs. High-Moisture

Waterborne varnish is a good choice indoors. It works well on furniture, trim, and cabinets.
Waterborne varnish is a smart indoor pick, working great on furniture, trim, and cabinets.
The cured film is tough, clear, and dries fast. It resists daily bumps and stays clear on light woods.
Low VOC levels make it easier to use inside. Choose a satin, gloss, or matte sheen for the look you want.
Sand bare wood to 220 grit, wipe off the dust, and lay a drop cloth. Tape off edges with painter’s tape before you start.
Apply thin coats and keep a wet edge to avoid lap marks. Smooth brush strokes and respect the drying time between coats.
Let the film reach full cure time before heavy use. If you stain first, follow the primer and topcoat directions from the maker and test a small area.
For interior pieces that take daily abuse, an alkyd resin cross-links harder than water-based products, providing extra resistance to scuffs and coffee rings.
| Environment | Verdict | Why |
|---|---|---|
| Living room | Excellent | Low moisture, high wear |
| Kitchen away from sink | Good | Spills wipe up easily |
| Bathroom | Poor | Steam defeats the film |
| Exterior | Skip | Use oil varnish or marine finish |
In a bathroom, mudroom, or pool area, water vapor will move through the film. Blushing and peeling can follow.
That behavior is normal for a waterborne polyurethane varnish. Use a solventborne varnish or marine finish in wet spaces.
Keep the finish dry. For exterior work, choose an oil varnish or marine finish.
Choose Water-Based Varnish by Adhesion, Stain Ratings, Sheen
Pick a water based varnish or polyurethane by checking adhesion and stain ratings before you compare sheen.
On an oil based stain, test adhesion first: apply a coat, let it dry, then scratch it with a knife.
If the finish flakes, the topcoat will not hold up, so strip or sand back and use a compatible primer.
For stain resistance, read the label rating and choose 15 or higher on a 22 point scale for daily spills.
Use a lower rating only on decorative pieces that see little wear.
Gloss sheen adds depth, but it shows every brush stroke and surface flaw.
Satin hides flaws better and suits furniture that gets regular use.
Matte looks wax like and is less durable, so keep it for low traffic surfaces.
Set up a drop cloth and painter’s tape, check the VOC level for indoor work, and keep a wet edge to avoid lap marks.
Sand between coats with the grit on the label, and respect drying time vs cure time before you handle or recoat.
For indoor work, prioritize water-based formulas because they stay crystal clear and emit lower VOCs than oil-based options.
Avoid These 5 Application Mistakes That Ruin the Finish

Most ruined water based jobs come from five common mistakes, and I have made all five in my own shop. Start by treating bare wood before you apply the finish.
Wet the surface to raise the grain, let it dry, then sand lightly with P320 or finer before you apply primer or the first coat. If you skip this step, the grain can lift and leave a rough topcoat.
Respect the recoat window on the can, which is often 2 to 4 hours for many water based varnishes. Drying time only means the film feels dry, while cure time tells you when it is fully hard.
Stir the varnish gently to keep air out of it, because shaking traps bubbles that can set into craters. Sand between coats with P320 or finer so you do not cut through the film.
Keep humidity below 70% when you spray, since heavy coats in damp air can cause blushing or a milky haze. Apply thin, even layers and keep a wet edge to reduce lap marks and brush strokes.
After the topcoat cures, check the sheen, whether gloss, satin, or matte, and touch up any thin spots. With these habits, your finish will look professional and even. For larger surfaces, using a microfiber paint roller with a 1/2-inch nap can help you lay down the varnish evenly and avoid brush strokes.
Frequently Asked Questions
Can I Recoat Water-Based Varnish After 24 Hours?
Yes, you can recoat water-based varnish after 24 hours, but that is usually past the ideal recoat window. Most water-based varnishes prefer recoating within 2 to 4 hours while the film is still slightly soft.
If you are at 24 hours, scuff the surface lightly with 220-grit sandpaper and wipe off the dust before applying the next coat. This creates a mechanical key and helps prevent poor adhesion.
Check the drying schedule and test a hidden spot first. For a typical water-based polyurethane, apply two or three thin coats rather than one heavy coat.
Does Water-Based Varnish Work Over Stained Wood?
Water-based varnish can work over stained wood if the stain is fully cured and compatible. Test adhesion on a hidden spot first, because some oil stains bleed through or repel waterborne finishes.
Make certain the stain has cured fully, then sand lightly with 220 grit to give the varnish a tooth. Apply two or three thin coats, allowing about 2 hours between coats and 24 hours before light use.
Watch for beading or poor leveling, which can signal contamination or incompatibility. If the finish behaves well, this clear waterborne topcoat gives good protection with easier cleanup.
Will Water-Based Varnish Yellow Over Time?
Water-based varnish will not yellow over time like an oil-based finish, so it keeps a clear look. It is the clearest choice for interior woodwork when you want the grain to stay bright. Apply three thin coats, sanding lightly with 220-grit paper between coats, to build a smooth film without runs.
For outdoor projects, UV exposure and humidity still affect durability, so choose a product labeled for exterior use and recoat as the maker advises. A waterborne clear finish can stay clear, but no finish is maintenance free in weather. Test a small board first and note the recoat window, often around two hours at 70 F.
Can I Apply Water-Based Varnish Over Oil-Based Varnish?
Yes, you can apply water-based varnish over oil-based varnish, but always run a compatibility test on a hidden spot first. Oil-based varnish leaves a slick surface, so scuff it with 220-grit abrasive until it looks dull, then remove the dust.
Apply a thin coat of bonding primer and let it dry fully before your water-based topcoat. That primer gives the waterborne finish a mechanical and chemical bridge so it grips instead of beading.
For a practical schedule, use two thin coats of water-based polyurethane, waiting the label’s recoat time, often about 2 hours. Keep the room warm and well ventilated, and avoid heavy sanding between coats unless the finish feels rough.
How Do I Prevent Brush Marks in Water-Based Varnish?
To prevent brush marks in water-based varnish, apply thin, even coats with a lightly loaded brush and keep moving before the finish tacks. I treat it like frosting a cake, not slathering on a heavy layer. Load only the last third of the bristles, then lay off gently in one direction.
Sand between coats with 220-grit paper once the varnish is fully dry, usually after 2 to 4 hours, and remove dust with a tack cloth. Keep your coat count modest, two or three thin layers, rather than one thick film. For a smoother water-based polyurethane finish, avoid overbrushing and do not go back over areas that are setting.
Rounding Up
For most projects, water-based varnish is the right call, especially if you hate yellowing and want clarity over nostalgia. Check your finish needs carefully first: choose polyurethane for adhesion, lacquer for speed, and a blend for everything else today.
Test thin coats today, avoid humid days, and never shake the can like a martini. Compare your current finish first against that maple table that looked like a nicotine stain within a year, then switch to it for clear results three years later.
Related topic to read next: oil-based polyurethane finish.