How to Apply Alkali-Resistant Primers: Step-by-Step Guide

Applying alkali-resistant primers is the only way to stop fresh concrete from turning your new paint into a chalky, dusty mess.
Before you grab a brush, check the surface pH and clean off any dirt, since a reading above 10 will ruin your bond.
Mix a 100% acrylic primer with a splash of water, then roll it on in a “W” pattern using two thin coats instead of one heavy one.
Let that base cure for a full week, and only then think about your topcoat.
This guide walks you through the exact timing, mixing ratios, and cure schedules so your finish stays put for years.
Stick around for the step-by-step details on surface prep and drying times.
Quick Answer
- Test pH below 10 on dry, cured concrete before priming alkaline surfaces.
- Clean off efflorescence with a stiff brush or pressure washer first.
- Stir primer thoroughly, then dilute with 5-10% water for brushing or rolling.
- Apply two thin coats in a W pattern, maintaining a wet edge to prevent lap marks.
- Wait 7 days for full cure before topcoating to avoid trapping moisture.
Why Alkali-Resistant Primers Stop Efflorescence and Lime Burn
If fresh concrete turns into a chalky, white mess, that’s efflorescence. It happens when moisture drags alkaline salts to the surface, and it will ruin your paint job fast.
An alkali-resistant primer stops this problem by forming a tough barrier that blocks those salts from migrating upward. At the same time, its vapor permeability lets trapped moisture escape without carrying salts along.
That balance is everything. If the film is too tight, you trap water and get blistering; too loose, and the alkali breaks through and creates lime burn.
I’ve watched cheap primers fail within months, leaving white streaks under the topcoat. For most DIY work, grab a quality 100% acrylic water-based primer with low VOC.
It’s forgiving, low-odor, and adheres beautifully to masonry or fiber cement. Sand the surface with 80 or 120 grit first, then roll on a full wet edge to avoid lap marks.
Let the primer dry completely before your topcoat, and don’t confuse drying time with full cure time.
Use painter’s tape and a drop cloth, and you’ll get a clean result that lasts. Skip this step, and you’ll be repainting sooner than you think. Efflorescence removal via brushing is necessary before applying any of these primers to ensure proper adhesion and prevent future salt damage.
Pick Water-Based or Solvent-Based Alkali-Resistant Primer

When you are staring at the shelf, the choice comes down to how much you value your lungs and your time. I pick water-based almost every time for most walls.
Water-based primer gives you solid durability against efflorescence and lime burn, which is exactly what raw concrete and fiber-cement need. Cleanup is just soap and water, no harsh fumes, and it dries fast enough to topcoat the same day. Check adhesion ratings for claims like 5× stronger or bonds without sanding if you are working with slick surfaces.
Solvent-based primer does offer stronger adhesion on tricky surfaces, but it dries slower and smells like a chemical factory. Unless you are coating something oily or glossy, that extra bite is wasted effort.
For a typical porous wall, water-based is the practical buy. It costs less, brushes on smooth, and lets you keep a wet edge without fighting lap marks.
Grab a water-based primer, a decent brush, and a drop cloth. You will be done faster, breathe easier, and your topcoat will sit on a clean, stable base.
Clean, Patch, and Cure the Concrete Before Priming

Right, once you’ve picked a water-based primer, the prep work decides everything. You can’t just roll it over dirty concrete and hope for the best.
Grab a stiff brush or a pressure washer and blast off grime, peeling paint, and that whitish efflorescence powder. Then fill any cracks with an elastomeric patch, since it flexes with the slab and won’t crack open again.
Before you patch anything, test the substrate’s pH. Fresh concrete is often above 13, which will eat your primer and ruin the bond.
You want the pH below 10, ideally, and if the slab is new, you must monitor its curing time. Most suppliers say 30 days is safe, though 7 days can work if the pH stays under 13.
Use a cheap pH test kit from a hardware store, and don’t skip this step even if the concrete looks dry. A wet slab can read falsely, so test in a few spots and let the surface dry out after washing.
Once the surface is clean, patched, and cured, the primer will grip tight and your topcoat will last. Skip this and you’ll see peeling within a year, guaranteed.
Lay down a drop cloth and run painter’s tape along any edges before you prime. Use a brush for corners and a roller for the open floor, keeping a wet edge so you don’t get lap marks.
Remember that drying time is not the same as cure time, so wait the full period before walking on it or adding a topcoat. A satin or matte sheen hides minor imperfections better than gloss, so pick your finish based on how much traffic the floor gets. For long-term durability on high-traffic areas, consider a densifier and hardener that chemically reacts to strengthen the slab from within.
Mix and Dilute for Brush, Roller, or Spray
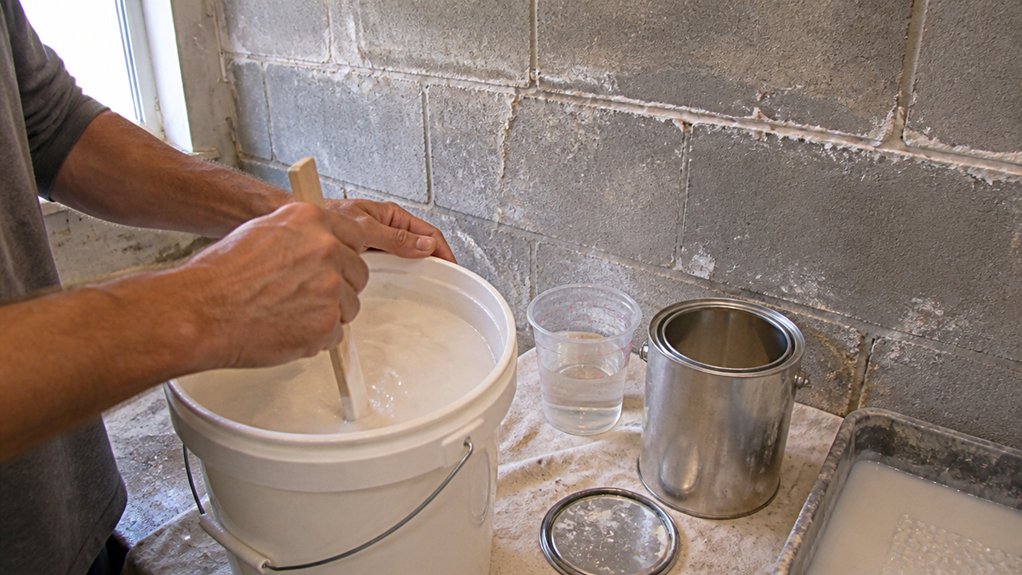
Stir your primer before you open the can, and keep it moving while you work. A drill stirrer or a wide wooden baton does the job, and the goal is a creamy, uniform ribbon flowing off the stick with no clumps hiding at the bottom. Spiral or helix designs prevent air bubbles and pull material from the bottom for a consistent mix.
Temperature changes the mix. Cold primer thickens, so add more water; hot days need less water to avoid runs.
Add 5 to 10% clean water for brush and roller work so the primer glides like butter instead of dragging through glue. For spraying, thin 10 to 20% so the gun lays down a fine, even mist for thin, consistent coverage.
Match your dilution to your method and keep your wet edge going so you don’t leave lap marks. Stir, pour, stir again, and check that the primer flows smooth before you load your brush or gun.
Keep a drop cloth and painter’s tape handy, and remember that drying time and cure time are different things. Get the mixing and dilution right and your topcoat will sit flat, whether you finish with satin, gloss, or matte sheen.
Apply a Uniform, Durable Base Coat Evenly

Your mix matters, but the real test is how you get it on the wall. Load the roller fully, then lay down a wide “W” pattern across a 4×4 foot section to spread an even base coat.
Back-roll over that pattern, pulling the wet edge continuously as you go. Never let a section dry before you feather the next one in, or you’ll see lap marks under your topcoat.
Let the roller nap carry the material instead of pressing hard into the surface. A heavy hand builds ridges that you’ll sand for an hour, so keep the pressure light and steady.
Two thin passes beat one thick blob every time, especially with primer. Cut in the corners with a brush before you roll, and keep a wet edge from start to finish.
Move fast enough that everything stays damp, but don’t rush your strokes. The goal is a smooth, alkali-proof foundation that your topcoat can grab without showing brush strokes or roller texture.
Watch your drying time, not just cure time, since primer sets quickly. Once it’s dry, sand lightly with 220 grit to knock down any nibs, then wipe off the dust before you roll on your finish. For a non-yellowing, clear base on craft surfaces, maintain a water dilution ratio near 1:4 to avoid runoff and ensure sufficient film thickness.
Drying, Recoating, and Coverage Tips for Alkali-Resistant Primers

The drying time on alkali-resistant primer decides your schedule, not the label on the can. Touch-dry usually happens in about 30 minutes at 25°C, but that’s just the surface settling.
Wait the full 2 to 8 hours before recoating, or you’ll lift your own work and end up with peeling patches. I’ve made that mistake on a Tuesday, and it’s a humbling fix.
You can tell the primer is ready when the matte sheen shifts to a slightly chalky look, like a powdered donut. Run a fingernail across it, and if there’s no ridge, just a smooth quiet surface, you’re good.
The color also evens out as dampness escapes, so those patchy dark spots fade to a uniform tone. That’s your green light for the next coat.
For coverage, plan on 7 to 9 square meters per liter over smooth concrete block. Rough masonry will eat about 30% more, so measure your surface twice and pour once. Alkali resistance must withstand pH 13 or higher, so verify your primer’s rating before applying it to fresh cement.
Full cure takes a full 7 days, so don’t rush your topcoat over it. Let the primer breathe, and you’ll avoid trapping moisture under your finish.
Keep a wet edge when you roll, and use a brush for tight corners to avoid lap marks. Lay down a drop cloth or painter’s tape to protect trim, and check the VOC level on the can if you’re working indoors.
Sanding between coats isn’t usually needed with this primer, but a light pass with 220 grit can smooth any nibs. Just wipe off the dust before the next layer.
Frequently Asked Questions
Can I Apply Alkali-Resistant Primer Over Old Paint?
Yes, you can apply alkali-resistant primer over old paint, but only if the surface is sound and properly prepared.
Scrape off every bit of peeling or flaking paint with a stiff putty knife, then wash the area with a mild detergent and rinse well. If you skip this step, the new primer’s bond will fail, and the old coating will pull it off within months.
For a truly stubborn spot, sand down to a feathered edge using 120-grit paper, then wipe away all dust with a tack cloth. This step also smooths rough edges, which helps the primer flow evenly and reduces the chance of visible ridges.
Once the surface is clean and dry, apply one full coat of alkali-resistant primer, and let it cure for at least 24 hours before topcoating. For exterior masonry or concrete block, this primer is your best guard against efflorescence, so pair it with a breathable acrylic paint for lasting results.
What Happens if I Paint Before the Primer Fully Cures?
If you paint before the primer fully cures, you risk severe adhesion failure that will turn your project into a peeling disaster. The uncured solvent and water in the primer get trapped beneath the topcoat, preventing it from bonding properly to the surface.
That trapped moisture creates a weak layer, and the finish can lift off in sheets within weeks, leaving blotchy patches. For most water based primers, allow a full 24 hour cure, not just the touch dry time on the can, before applying your topcoat.
If you are using shellac or oil based primer, check the recoat window, often 2 to 4 hours, but never sand early. Always test adhesion by pressing tape onto a corner and pulling it off. If any primer comes away, wait another 6 to 12 hours and test again.
Can I Use Alkali-Resistant Primer on Damp Concrete?
Yes, you can use alkali-resistant primer on damp concrete, but only if the dampness is within the material’s tolerance limits, which is rarely the case. Damp concrete often exceeds those limits, and applying primer then will cause poor adhesion and peeling later.
You must first address the moisture source and let the surface dry completely. For new slabs, wait at least 28 days of curing, then test by taping plastic sheeting overnight; if condensation forms, it’s still too wet.
Once dry, rough up the surface with a 40 or 60 grit sandpaper to open the pores. Clean off all dust, then apply the alkali-resistant primer in one even coat. For best results, use a moisture meter to confirm readings below 5% before sealing.
If time is short, consider a damp-proof membrane or a specialized bonding primer instead, since alkali-resistant formulas aren’t designed for wet substrates. Patience here saves you from a costly redo, so wait for that dryness.
How Do I Fix Efflorescence That Reappears After Priming?
To fix efflorescence that reappears after priming, you must first trace and eliminate the source of moisture, then remove all salts before any coating can hope to bond. Simply re-priming covers the stain only temporarily, because water penetrating from outside will keep pushing new salts to the surface.
Begin by checking gutters, downspouts, and grade slope near the foundation, since a common culprit is splashback on a basement wall. Scrape and wire-brush the effected area, then wash it with a 50/50 white vinegar and water solution, allowing it to dry for at least 48 hours.
After that, apply a salt-tolerant, alkali-resistant primer like a shellac-based sealer, which blocks residual crystals better than latex. For stubborn spots, sand with 80-grit to expose the substrate, then use two coats of masonry primer before your topcoat. Skip standard latex primer here, as it’s water-based and re-dissolves salts.
If moisture keeps returning, consider an exterior waterproofing membrane or a dehumidifier inside. Remember, efflorescence is a symptom, not the problem, so chasing it with primer alone wastes time, money, and leads to peeling. For long-term success, search “masonry moisture control” and fix the drainage crack first, then repaint.
Is One Coat Enough for Highly Porous New Concrete?
One coat is rarely enough for highly porous new concrete, so plan on using two thinner coats instead of a single heavy one.
The first pass will soak in unevenly, and you’ll see blotchy Primer absorption that can ruin adhesion and cause later peeling.
For best results, apply the first coat, let it dry fully (typically 24 hours at 70°F), then lightly sand with 120 grit to knock down raised grain.
Wipe off the dust, then roll on your second coat evenly; this builds the protective barrier without trapping moisture.
A specific tip: use a high-build masonry primer or a solvent-based sealer for deep penetration, then top with a water-based finish.
Related terms like “concrete densifier” or “penetrating sealer” will help you find the right product for your slab.
Rounding Up
Apply alkali resistant primer as your concrete’s armor, not a luxury. Skip it, and efflorescence creeps back like a bad houseguest, so roll on one coat for most jobs and two for rough, porous slabs.
Dries fast, so plan to recoat in about 4 hours. Check your slab’s condition first, and ask yourself if it’s porous or damaged before choosing the second coat.
For roughly $30 a gallon, apply it with a roller, no need to overthink spraying. Test a small patch first, then commit to the full surface, and your paint will hold tighter than a toddler with a juice box.
Do it once, do it right, and walk away. Next, read about curing concrete before painting.