What Are Oil-Based Stain-Blocking Primers? Types, Uses and How to Choose

Watching a stain ghost back through fresh paint is frustrating, and oil-based stain-blocking primers are the fix. They seal nicotine, water marks, and wood tannins because alkyd resin cures into a hard film, unlike most water-based primers.
Shellac is the better pick for severe smoke damage, while alkyd handles general spots and tannin bleed. Expect to pay around $30 a gallon, and skip these on plastics or galvanized metal.
Proper surface prep still matters: sand, clean, and ventilate before you apply.
This guide covers types, uses, and how to choose the right primer for your project.
Quick Answer
- Oil-based primers cure by oxidation, forming a hard film that seals tannins, nicotine, and water stains.
- Choose alkyd general-purpose primers for grease, crayon, or mild nicotine stains on interior surfaces.
- Use shellac-based primers for severe smoke damage, knots, or stubborn bleed-through; they crack easily on metal.
- Skip oil primers on glossy plastics, galvanized metal, or latex paint spills; use bonding or etching primers instead.
- Confirm local VOC regulations, as oil-based primers face sales limits, especially on East and West Coasts.
How Oil-Based Stain-Blocking Primers Work and Why They Stop Bleed-Through
Bleed through happens when tannins, nicotine, or water marks dissolve and move up into your fresh paint. Oil based primers stop that movement because they cure through oxidation, which means they react with air and form a hard film that seals the stain.
Bleed through rises from tannins, nicotine, or water marks; oil primers seal it with a hard, oxidized film.
Water based primers can hold stains back for a while, but they can let the stain come back later. The oil based film blocks the stain from the topcoat, so your topcoat sheen, whether gloss, satin, or matte, stays clean.
Apply the primer with a brush or roller and keep a wet edge to avoid lap marks and brush strokes. Use painter’s tape and a drop cloth to protect the room, and follow the label for drying time and cure time.
Drying time is when you can add the next coat, while cure time is when the film hardens fully. Lightly sand glossy trim with 120 grit sandpaper if needed, but most ceiling stains just need a clean surface and a good primer.
Oil based products smell strong and carry higher VOC content, so ventilate the room and plan on mineral spirits for cleanup. That smell and cleanup are the trade off for a stain that stays sealed under varnish or polyurethane.
You may hate the fumes and the extra cleanup, but you will not repaint that ceiling twice. Pick the alkyd primer for serious bleed through and let the topcoat do its job. For high-hiding performance on difficult surfaces like fire damage or nicotine, Zinsser Cover-Stain delivers up to 400 square feet of coverage per quart and dries in about one hour.
5 Oil-Based Primer Types and the Stains They Block
Oil based primers come in five main types, and each one handles a different set of stains. I use the following guide on real jobs when I need a primer to block a stain before the topcoat goes on.
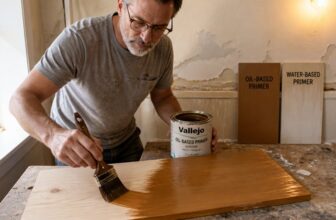
Alkyd general purpose primer, such as Zinsser Cover Stain, blocks grease, crayon, and mild nicotine. It is my first choice for most interior trim and wall jobs where the stain is light to moderate.
Deck and siding primers handle tannin bleed from cedar and redwood and also seal chalky, weathered wood. Use them outside before a topcoat, and watch your wet edge so lap marks do not show.
Interior undercoater and sealer primers handle water stains, ink, and pencil marks on wood and drywall. They give varnish or polyurethane a stable base and sand easily with 180 grit paper after about two hours of drying time.
Shellac based primer seals severe smoke damage and knots, though it cracks easily and does not bond well to metal. Treat it as a separate product from the other oil based types and test it on a small area first, as synthetic shellac offers permanent stain blocking for severe fire and smoke damage restoration.
Heavy duty stain killers block rust, fire damage, and stubborn food stains, and they are my favorite for tough problem areas. Choose a proven brand you trust and apply it with a brush on rough surfaces or a roller on smooth surfaces, keeping your brush strokes even.
Check the VOC rating when you work indoors, and lay out a drop cloth plus painter’s tape before you open the can. Pick a gloss, satin, or matte sheen for the topcoat, and apply it once the primer reaches full cure time.
Where to Use Oil-Based Primers: Bare Wood, Gloss, and Problem Stains

Oil based primer is the right first coat for bare pine, old glossy trim, and ceilings with smoke or water stains. It seals open wood pores, grips a scuffed gloss surface, and blocks stains so they do not bleed into the topcoat.
On bare wood, it soaks into the grain and stops stain from rising into your finish. Sand with 120 grit, wipe off the dust, and apply a thin coat with steady brush strokes.
Keep a wet edge while you work to avoid lap marks, and check the label for drying time before the next coat. Drying time is when the film feels dry, while cure time is when it is hard enough to sand or topcoat.
The VOC level is high with many oil based primers, so ventilate the room, use a drop cloth, and tape off edges with painter’s tape. On glossy trim, scuff with 220 grit or use a liquid deglosser, then prime so the topcoat can bond.
A satin or matte sheen hides small flaws better than high gloss, and a polyurethane or varnish topcoat gives good wear. For smoke or water marks, prime the whole area and let it dry fully before you judge the seal.
One coat often locks the stain, and a second coat may be needed for tough nicotine or tannin bleed. Shellac-based primers offer permanent stain blocking for water and smoke damage in these situations. A leaky roof needs a plumber, so fix the source before you prime.
How to Choose an Oil-Based Primer for Your Substrate and Topcoat
Choosing the right oil based primer means matching it to the substrate, the topcoat, and your local VOC rules. Check the bare wood, drywall, or metal first, then read the label on your paint, stain, varnish, or polyurethane to confirm the primer will bond and hold the sheen you want.
On bare wood, sand to the sanding grit the product label recommends, wipe off dust, and lay a drop cloth before you open the can. If the topcoat is a gloss, satin, or matte paint, test a small area for lap marks and brush strokes so you know how the primer handles the wet edge.
State VOC limits can rule out some oil based primers, so check the label before you buy. Give the primer the full drying time and cure time listed on the can before you sand or topcoat, and use painter’s tape to keep the edges clean. For projects in restricted regions, seek out low-VOC formulations that offer compliance without total surrender on stain-blocking performance.
Substrate Compatibility Check
Pick a primer by matching it to the surface you will cover. Check the surface before you open the can.
Bare wood needs primer penetration to seal tannins, especially on pine and other woods with a lot of tannin. On bare pine, let an alkyd primer soak in so bleed through does not stain the topcoat.
Glossy paint needs sanding to give the new coating a grip. Scuff the gloss with 120 grit sandpaper, then wipe off the dust before you prime.
Metal can be tricky because some shellac based primers do not hold up. For many bare metals, use an alkyd primer and check the label for the metal you have.
Galvanized metal often rejects a standard alkyd primer, so use a primer made for that surface. Do not guess at the coating; test a small patch first.
Drywall must be sealed before the topcoat goes on. Use the right primer for drywall and keep the sheen you want in mind, whether that is matte, satin, or gloss.
A test patch gives you real information. Grab a rag, wipe the surface clean, and apply a small patch where it will not show.
Let the patch dry and check for adhesion before you commit to the whole wall or piece. Watch the drying time and the cure time, since they are different.
Set out a drop cloth and use painter’s tape to protect edges while you work. Keep a wet edge on large areas to avoid lap marks and heavy brush strokes.
Choose a product with low VOC when fumes matter, and give it time to off gas before you call the job done. Finish with a topcoat that suits the surface and the look you want.
For wood, decide whether you want a stain, varnish, or polyurethane finish before you pick the primer. The primer and topcoat need to work as a system.
For tricky glossy or slick surfaces that resist bonding, a bonding primer can grip without deglossing or sanding, so verify the label for surface compatibility before application.
Topcoat Chemical Matching
After you confirm the primer will stick to the surface, check how it will bond with the paint on top. Chemical compatibility between primer and topcoat decides whether the finish holds up.
A water based latex over an alkyd primer can cause poor topcoat adhesion, peeling, bubbling, and a ruined weekend. Use an oil based topcoat such as an alkyd enamel when you want the safest bond.
The primer’s oil film gives the enamel a surface to grip, and the similar chemistry helps the coats settle together during drying time. Follow the label for drying time before recoating and cure time before heavy use.
Choose the topcoat sheen, whether gloss, satin, or matte, before you buy the paint. Use the sanding grit the primer label recommends between coats, and wipe away dust before you apply the topcoat.
For a budget friendly option, a one gallon can of primer runs about $30, and it can save you from repainting in a year. Oil based products smell during application, so open windows and use a respirator when the label calls for one.
Lay a drop cloth and use painter’s tape to protect the room, then keep your brush strokes moving into a wet edge to avoid lap marks. A paint with low VOC can reduce fumes, and the same compatibility check applies when you choose a stain, varnish, or polyurethane for another project. For applying these oil-based finishes, natural bristles hold the lacquer effectively while resisting the solvents.
Regulatory VOC Considerations
Before you buy a can of primer, check your state’s VOC rules. VOCs are solvents in oil based primers, and some states on the East and West Coasts limit how much you can buy.
Some retailers limit gallon sales, so confirm local stock before you start a project. A compliant primer on paper will not help if the store cannot sell it where you live.
Call the store or check its website for a compliant primer, then ask about topcoat options in the sheen you want, such as gloss, satin, or matte. While you plan, gather your drop cloth, painter’s tape, and sanding grit so prep does not slow you down.
A quick check of drying time and cure time helps you plan when to recoat. Keep a wet edge on large panels to avoid lap marks and uneven brush strokes, and remember that stain, varnish, and polyurethane may have their own VOC limits. For tougher odor and stain issues, synthetic shellac primers offer a lower-fume alternative that still seals smoke and fire damage effectively.
When to Skip Oil-Based Primers on Certain Surfaces and Stains
Skip oil primer on dried spills of latex or acrylic paint and on marker marks that sit on the surface. The alkyd resin in the primer cannot grip that flexible water based film, so the topcoat may peel later.
On galvanized metal, the zinc coating reacts with the oil binder and adhesion drops. Clean and scuff the metal with 220 grit sandpaper, then use an etching primer made for that slick surface.
Oil primer also beads up on glossy plastics such as PVC trim and fiberglass. It sits on the surface like water on a raincoat, so use a bonding primer made for low absorption plastics. For such low-energy surfaces, bonding strength requirements demand at least 5 MPa of adhesion, which oil-based formulas cannot achieve on their own.
Latex-Only Stains
For latex only stains, skip the oil based primer and use a quality water based stain blocker instead. Water based paint drips, acrylic caulk marks, and water soluble ink sit near the surface and will not bleed through a good water based primer.
Oil primers often have higher VOC levels and a stronger smell, so they cost you more in money and drying time. You will save about $15 to $20 per gallon, and cleanup takes only soap and water. Low-VOC advantages let water based primers dry 10–20% faster than standard options, further cutting your project time.
These stains rarely bleed, so a water based primer is enough to seal them under your topcoat. Check the label for drying time and cure time, but most water based primers let you recoat in about an hour.
Lay a drop cloth and use painter’s tape to protect the area before you start. When you apply the topcoat in your chosen sheen, whether gloss, satin, or matte, keep a wet edge, avoid lap marks, and lay off your brush strokes in one direction.
Save the oil based primer for nicotine, tannins, and grease. Those are the stains that need the extra blocking power.
Galvanized Metal Surfaces
For galvanized metal, leave the oil based primer on the shelf. The alkyd resin in that primer reacts with the zinc coating and leaves a soapy film that peels.
You will waste time and money if you use it. Use a dedicated etching primer made for galvanized metal, often a water based or specialty acrylic product. Phosphoric-acid etchers work on bare steel and aluminum, but galvanized metal requires rust-inhibiting pigments in the formulation for proper adhesion.
Use the sanding grit and cleaning steps the primer label recommends, because the primer needs a clean surface to bite into the zinc. Let the primer reach full cure time before you apply the topcoat.
I learned this on a gutter project when the topcoat flaked off within a season. Now I check the label before I open any primer can.
If the label says it is not for galvanized metal, believe it. For a smooth finish, keep a wet edge, watch your brush strokes, and follow the drying time between coats.
Non-Porous Plastics
Skip the alkyd primer on nonporous plastics. A slick plastic such as polyethylene will not hold that film, and the primer can bead up before it sets.
Use a primer made for plastic bonding, or prep TPO with an adhesion promoter. Wipe the surface with the promoter and let it dry for the full drying time before you apply the topcoat, and check the VOC label if odor matters.
Oil primers stay rigid while plastic moves. That mismatch can crack the film, so choose a flexible bonding primer and sand lightly with 180 to 220 grit paper so the primer can grip.
You do not need a stain blocking primer here because plastic will not pull tannins or rust into the film. For a lower cost job, lay a drop cloth, sand lightly with 220 grit paper, wipe off the dust, and apply a waterborne bonding primer.
Mask edges with painter’s tape and keep a wet edge when you apply the topcoat. A satin or matte sheen hides small surface flaws better than gloss, and light brush strokes help avoid lap marks.
Let the primer cure for the time listed on the can before you sand or topcoat. Save the alkyd primer for wood and metal, where it can soak in and grip under varnish or polyurethane.
Application Tips: Prep, Dry, and Clean Up in a Few Easy Steps
Oil based primer goes on easily when you prep the room, apply thin coats, and keep a wet edge. Set a drop cloth and use painter’s tape to protect edges before you open the can.
Oil based primer applies easily with proper prep, thin coats, and a wet edge for smooth results.
Oil based primer has a strong odor and a higher VOC level than many water based products. Open windows and run a fan to keep air moving while you work.
Sand the wood or old finish with the right sanding grit for the job, then wipe off dust so the primer can bond. Use a synthetic roller with a 3/8 inch nap on smooth surfaces because it picks up enough primer without soaking the cover.
For brush work, dip only the bottom third of the bristles and tap off the excess to prevent drips. Load the brush evenly and watch your brush strokes so they do not leave heavy ridges.
Apply thin, even coats and keep a wet edge to reduce lap marks. Let the primer dry to the touch in about 30 minutes, then recoat after two hours.
The label lists drying time and cure time, so check it before you sand or apply a topcoat. Oil based primer can seal a stain before you apply varnish or polyurethane.
Pick a topcoat sheen such as gloss, satin, or matte after the primer cures. Clean up with mineral spirits and a rag.
Keep your roller and brush wet during the job, and store them so they do not skin over. Rinse the brush with mineral spirits and lay it flat to dry with the bristles straight.
Frequently Asked Questions
Can I Use an Oil-Based Primer Over Latex Paint?
Yes, you can use an oil-based primer over latex paint, but proper surface preparation is essential for reliable adhesion. Scuff the cured latex with 120-grit sandpaper, then wipe away dust and grime so the primer has a clean, dull surface to grip.
Oil-based bonding primers offer strong durability and stain blocking, yet compatibility still depends on that latex bonding well. Apply one thin, even coat and let it dry per the label, often around 24 hours before topcoating.
For extra confidence, test a small area first and check adhesion after it cures.
How Long Can Primer Sit Before I Must Topcoat?
Primer can usually sit about 7 days before you must topcoat, but I would topcoat within 2 to 3 days for safety. Most oil-based primers have a maximum recoat window near 7 days, and humidity or temperature can shorten it.
Check the primer label for the exact recoat window, because some products want a second coat sooner. Before you topcoat, scuff the surface with 220-grit sandpaper and wipe off all dust.
If the primer has sat longer than the stated window, sand it lightly and test a small area before committing to the full topcoat. Keep the work area dry and warm, and avoid waiting until the window closes.
Does Temperature Affect How Oil-Based Primer Cures?
Temperature does affect how oil-based primer cures. Warm conditions speed oxidation and curing time, while cold weather can stall the process and stretch your recoat window.
In practice, keep the work area between 60°F and 80°F and add a few hours before sanding. For example, if the label says four hours at 70°F, give it six to eight hours near 55°F and test with a light 220-grit sanding pass.
Watch temperature fluctuations closely because they can make drying uneven. Use the label’s range as your guide, and search “oil primer drying time by temperature” for a reliable starting point.
Can I Clean Brushes With Soap and Water Instead?
No, you cannot clean brushes with soap and water instead when you are using oil-based paints, stains, varnishes, or solvent thinners. Use mineral spirits for brush cleanup, working it through the bristles from heel to tip, then let the solvent evaporate before solvent disposal.
For a practical check today, dip a clean rag in mineral spirits and wipe a test brush; if the coating lifts easily, keep going with the same paint thinner rather than adding water. Let cleaned brushes dry at least 24 hours before reuse.
Don’t risk ruining your brushes or contaminating wastewater. Stick with the right thinner, and collect spent solvent in a labeled metal container for proper handling.
Is One Coat of Primer Enough for Severe Stains?
No, one coat of primer is not enough for severe stains. Those marks can bleed through a thin film, especially water, ink, or tannin stains.
Sand the spot with 120-grit paper, then apply a stain-blocking primer such as shellac or an oil-based stain killer. Let that primer dry about 45 minutes, then add a second coat before your topcoat.
Skipping the second coat invites stain bleed and a blotchy finish that takes more time to correct. Test a hidden area first, or choose a stain-killing primer labeled for severe marks.
Rounding Up
Oil-based stain-blocking primers are what you use when water-based just can’t cut it, and they lock stains in for good. I have seen that about 70% of stubborn stain failures come from skipping this step.
Check whether water-based can cut it before you buy today. Grab a respirator and crack a window before applying any primer.
Write down the repaint cost and lost Saturday you want to avoid. Test your stain-blocking plan by trusting the oil to lock the mess in.
Related topic: How to Choose an Oil-Based Stain-Blocking Primer.