
How to Apply Marine Paints: Step-by-Step Guide

Painting over rust or peeling coats is a gamble you will lose. How to apply marine paints starts with surface prep, not the first brushstroke. Blast off mill scale and rinse away salt, or your topcoat fails within a season.
Check humidity below 80% and keep the surface 3°C above dew point, or trapped moisture ruins the cure time. Mix two-pack paints precisely, respect induction time, and lay down thin, even coats with a wet edge.
Primer, recoat windows, and drying time all matter more than sheen choice. This guide walks you through every step, from dew point checks to final coat, so your finish lasts.
Quick Answer
- Prepare surface by abrasive blasting, fresh water wash, and solvent wipe before priming.
- Check air temperature, dew point, and humidity to prevent moisture entrapment.
- Mix base and curing agent in exact ratio, then observe induction and pot life.
- Apply primer and topcoat with matching methods: spray, brush, or roller.
- Maintain a wet edge and work in thin, even passes to avoid lap marks.
Why Surface Prep Makes or Breaks Your Paint
Skipping surface prep is the fastest way to ruin a marine paint job, and I’ve watched it happen more than once. That grey layer on new steel is mill scale, and if you don’t blast it off, your paint will peel like sunburnt skin.
Salt contamination is the quieter enemy, hiding under a clean-looking surface. A simple wash-down with fresh water and a salt test kit costs little, but it stops blisters from forming months later.
You need to sand or blast down to bare metal, then wipe with a solvent to remove any grease. Use a primer suited for the steel, and don’t skimp on the coating thickness.
Abrasive blasting runs about $3 to $5 per square foot, but a failed topcoat will set you back ten times that in labor and haul-out fees. Budget for the gritty prep work, or get ready to pay for a full redo.
Drying time and cure time are different, so read the can and wait for the real cure before launching. On a humid day, even a perfect prep job can trap moisture, so check the forecast before you open the paint bucket. Curing provides full hardness and chemical armor after the touch-dry state, which is why waiting the extra days protects against blistering.
For a durable finish, apply the primer, then two topcoats with a satin or gloss sheen, keeping a wet edge to avoid lap marks. Use painter’s tape to mask fittings, and lay down a drop cloth to catch drips from brush strokes.
Clean steel and honest salt checks get you halfway to a hull that lasts, and that’s the part I never skip. The other half is patience, waiting for the right weather and the full cure time.
Check Temperature, Humidity, and Dew Point

You’ve got a clean, bare hull ready to go, but painting in the wrong conditions will cause problems you’ll regret later. Your paint needs a stable environment to bond and cure properly, so check these numbers before you mix anything.
First, aim for air temperature between 10 and 25°C. If it’s too hot, solvents flash off too fast and you’ll get brush strokes or lap marks; if it’s too cold, curing stalls and the finish stays soft for days.
Second, measure the surface temperature with a thermometer. The surface must sit at least 3°C above the dew point, or moisture will creep under your primer and topcoat, causing blisters later.
Third, keep relative humidity under 80%. Use a simple humidity monitor, which costs little and saves you from peeling varnish or polyurethane down the road. A monitor with a humidity accuracy of ±3% RH or better gives you reliable readings for this critical check.
For precise checks, grab a dew point meter. These gadgets tell you exactly when condensation forms, so you don’t paint into a disaster on a cloudy morning.
I check these readings before every coat, even on sunny days, because that boring routine prevents a mess. Skip this step, and you’ll watch your hard work blister and flake, forcing you to sand down to bare wood with a coarse grit and start over.
Paint first, measure second is the wrong order. Measure first, paint second, and you’ll get a smooth, even sheen, whether you’re using satin, gloss, or matte.
How to Mix Two-Pack Marine Paint Without Wasting a Batch

Two-pack marine paint is a base and a curing agent that only work if you blend them in the exact ratio. I have wasted plenty of cans by guessing the mix or walking away past the pot life, so let me save you that same expensive lesson.
Get the ratio and the induction time right from the start, and you will not turn a $300 can into a $300 brick. First, read the label on the base and the hardener because the numbers vary by brand, like 4:1 or 2:1 by volume.
Use a dedicated mixing stick with clear markings, or better yet, a small digital scale if the label gives weight. Pour the base into a clean bucket, then add the hardener slowly, stirring constantly to avoid streaks.
Stir for a full two to three minutes, scraping the sides and bottom with a flat spatula. This is the induction period, the time the mixed paint needs to sit before you apply it, usually 15 to 30 minutes, so set a timer.
Do not skip this rest, because a fresh mix will brush unevenly and show lap marks on your topcoat. After induction, give it one more quick stir, then pour it into a smaller tray or cup for easier handling.
Work fast but calmly, keeping a wet edge as you roll or brush, and do not go back over a section once it starts to tack up. Brush strokes disappear when you lay down a full, even coat, while a partial coat leaves ridges and sheen patches.
For a gloss or satin finish, use a high-quality brush with soft bristles and a short nap roller. Avoid thinning with solvent unless the label allows it, because extra solvent messes with the cure time and can dull the final sheen.
Keep a drop cloth and painter’s tape nearby, but the real trick is to measure twice and mix once. If you need to stop mid-job, cap the mixed paint tightly and put it in the fridge to slow the chemical reaction, but only for a few hours.
Cure time is not the same as drying time, so let the paint harden fully for a week before you sand or recoat with another layer, like a varnish or polyurethane topcoat. Sand between coats with 220 grit, wipe off the dust with a tack cloth, and check for any missed spots before you add the next coat.
The pot life is your enemy, so mix only what you can apply in that window, usually 45 minutes to an hour. A spare helper to keep the wet edge moving is worth more than any fancy tool.
If the paint starts to thicken or string in the bucket, stop and throw it away, because it has already started curing and will never level out. Clean your brushes and rollers with the right thinner right after you finish, because cured two-pack is nearly impossible to remove.
One last habit: write the mix date and ratio on the bucket lid with a marker. That way, you will know exactly what you used next time, and you will avoid guessing again. For a durable finish that resists fading, consider a two-part polyurethane which fights UV damage longer than single-part enamels.
Precision Ratio Mixing
Mixing two-pack marine paint by eye is a gamble with your money and your prep work. Precision ratio mixing comes down to arithmetic and a timer, not guesswork.
Check your digital scale calibration first, because a fifty-gram error can leave the cure tacky and ruined. I verify mine with a cheap calibrated weight before every batch.
Weigh the base container, then tare it to zero. Add the curing agent by weight, not volume, since densities differ between the two parts. Since solvent resistance matters more than capacity, stick to PET or polypropylene mixing cups that won’t warp or leach chemicals into your batch.
Stir slowly with a mixing paddle that matches the pot’s depth, and work gently to avoid trapping air bubbles. Scrape the sides and bottom twice, because unmixed resin hides there and causes soft spots later.
Once you mix, you have a working window before the paint kicks off, so have your primer and topcoat plan ready. Choose your paint sheen, whether gloss or satin, and check the VOC label for ventilation needs.
Use painter’s tape and a drop cloth to protect the surrounding area, and keep a wet edge to avoid lap marks. Drying time is short, but cure time takes longer, so wait before recoating or sanding with a fine grit.
Weigh, stir, apply, and walk away. Your paint will cure hard, and your wallet stays safe.
Induction & Pot Life Control
Mix your two-pack marine paint, and the clock starts ticking before the brush ever touches the surface. That’s the cruel truth of epoxy and polyurethane, so you need to respect both deadlines.
The induction time is the initial wait after mixing when the chemicals begin reacting. The pot life is the total window you actually have to use the batch, so tracking it matters.
I’ve ruined plenty of batches, trust me, so here’s my simple rule. Check the technical data sheet, set a timer, and never mix more than you can spray in one pass.
At 25°C, a typical epoxy gives you about 45 minutes, which is enough for two coats on a small hull. On a hotter day, cut that time in half before you even start.
Mix small, mix cold, and keep your primer and topcoat in the shade while you work. Use a wet edge to avoid lap marks, and don’t forget that drying time is not the same as cure time.
A drop cloth and painter’s tape protect your surroundings, and a low-VOC option helps your lungs. Brush strokes show up fast, so sand between coats with 220 grit if you want a smooth satin or gloss finish.
Your wallet and your sanity will thank you, so respect the clock and stay disciplined. That’s the whole trick. For faster, more uniform blending of your small batches, a mechanical paint shaker with adjustable clamps can cut mixing time to about ten seconds while protecting your container’s seal.
Choose the Right Application Method for Marine Paint

The application method you choose has more control over the final finish than the paint itself. For most marine work, I use an airless sprayer on big, flat surfaces because it lays down a uniform coat fast.
You still need a brush for edges and tight corners, no way around it. Match the tool to the job instead of grabbing whatever is closest.
For large hull sides and decks, airless spray wins. You get a smooth, even layer with no lap marks if you keep a wet edge, and you cover square footage in minutes. Use a tip size around .015 to .019 for most marine topcoats, and thin the paint only if the manufacturer says so.
Spraying needs more prep, though. Mask off everything you do not want coated, and check the VOC limits in your area if you are using solvent-based paint. A spray tent or calm day is essential, because dust and wind will ruin the gloss before it dries.
For touch-ups, striping, and all the tight spots around fittings, a brush is your best friend. Use a high-quality bristle brush for solvent paints and a synthetic one for water-based systems. Dip only the first third of the bristles, and lay the paint off in one direction to cut down brush strokes.
Rollers work well on curved surfaces like small boat topsides or cabin sides. A short nap roller, about 3/8 inch, gives a stipple texture that hides imperfections, but it will not match the smooth finish of a spray. Use a roller for the main area, then tip it with a brush while the paint is still wet to level out the stipple.
Primer is where you set the foundation. Apply it with the same method you plan for the topcoat, because the final sheen depends on how smooth the base is. Sand the primer with 220 grit after it dries, wipe down with a tack cloth, and you are ready for the next coat.
Drying time is not cure time. A coat may feel dry to the touch in two hours, but it can take a week to fully harden, especially in cooler weather. Wait the full recoat window before sanding or adding another layer, or you will pull up the wet film underneath.
Set up a clean workspace with a drop cloth under the boat and painter’s tape on every edge you want crisp. Good prep prevents runs and sags, which are the real enemies of a marine finish. Work from top to bottom, and keep a wet edge between sections so you do not see the seams.
If you are new to this, practice on a scrap piece of plywood before touching the boat. Test your spray pattern, check your brush technique, and see how the paint levels out. To match the gun’s output to your compressor’s real capacity, verify the air consumption requirements before you start, as a mismatched siphon feed gun will starve and sputter on a small tank. That practice saves you from stripping a bad coat later.
Airless Spray Techniques
Airless spray earns its place in your marine painting kit for two reasons: speed and a smooth, even film that a brush simply can’t match. I’ve learned that dialing in your technique beats pushing harder on the trigger every time. Pressure ratings above 3000 PSI deliver finer atomization for thick marine paints without thinning.
Start by sighting your tip overlap at 50%, meaning each pass covers half of the previous one. Miss that mark and you’ll see telltale stripes in the topcoat.
Keep the gun perpendicular to the surface, not tilted at an angle. Tilting wastes paint, causes runs, and breaks the wet edge you need for a uniform sheen.
Adjust the fan width control before you commit to the job. A narrow fan suits edges and trim, while a wide fan covers large flat decks quickly.
Crank the atomization pressure just enough to break the paint into a fine mist. Too much pressure creates overspray fog that settles on nearby surfaces, while too little leaves an orange peel texture.
I still curse my first hull’s sag marks, but once you practice on scrap wood with a drop cloth down, you’ll trust your gun on real work. Sand any runs with 220 grit, wipe clean, and recoat after the drying time, not the full cure time.
Use a low-VOC primer first to seal the surface, then lay down your gloss or satin topcoat in steady passes. Keep your painter’s tape tight along edges to avoid lap marks, and always maintain a wet edge as you move.
Master these basics, and you’ll coat decks like a pro without brush strokes or varnish bubbles. The real trick is simple: practice on scrap, then trust the gun.
Brush and Roller Use
A brush and roller is often the smarter choice, not a compromise. I grab them for small areas, edges, touch-ups, and maintenance where spraying is overkill.
A brush gives you precise edge control along masked lines and corners. A roller covers flat panels fast. Watch for tip buildup, that dried paint clumping at the brush’s end, and wipe it off before it lands in your finish.
Work the paint in thin, even passes. Keep a wet edge so overlaps blend without lap marks. It’s slower than spraying, but you spend far less time on painter’s tape and cleaning up. For marine applications, a 3/4-inch nap holds more paint per dip and handles semi-rough surfaces like old non-skid decks effectively.
For tight jobs, that trade pays off. You also get a smoother sheen on touch-ups, since you’re not fighting overspray on a satin or matte topcoat. Just lay down a primer first if the surface is bare, and use a drop cloth to catch drips.
Let each coat dry fully before the next, and remember cure time matters before heavy use. Brush strokes will show if you overwork the paint, so lay it down and leave it alone.
Equipment Selection Criteria
Choosing the right applicator for marine paint is about matching the tool to the job, not just grabbing whatever is closest. I have burned hours brushing a hull that should have been sprayed, so trust me when I say the decision matters.
Big surfaces like decks and hull sides want an airless spray rig, while small touch-ups and tight corners are faster with a brush or a short nap roller. For thick antifouling coatings, you need a pump with high delivery pressure to push the material through; thin primers move fine with a smaller pump.
Match your spray tip size to the paint’s viscosity, since a tip too narrow will clog and one too wide will waste product and cause runs. If you are running a long hose, use a larger diameter to keep pressure steady, but check that your compressor or pump can handle the extra volume. For high-flow application of thick, goopy coatings, look for a spray gun that delivers at least 60% more material per minute than standard models.
When you spray, the pump delivery is the heart of the operation, so do not cheap out on it. Rent a commercial rig for the big areas, keep a brush in hand for edges and details, and skip the discount sprayer entirely.
You will get better coverage, fewer lap marks, and a smoother finish with far less sanding later. Remember to keep a wet edge when rolling or brushing so brush strokes and dry spots do not ruin the topcoat, and always check the drying time versus full cure before recoating.
Wet-Film vs. Dry-Film Thickness: Why It Matters
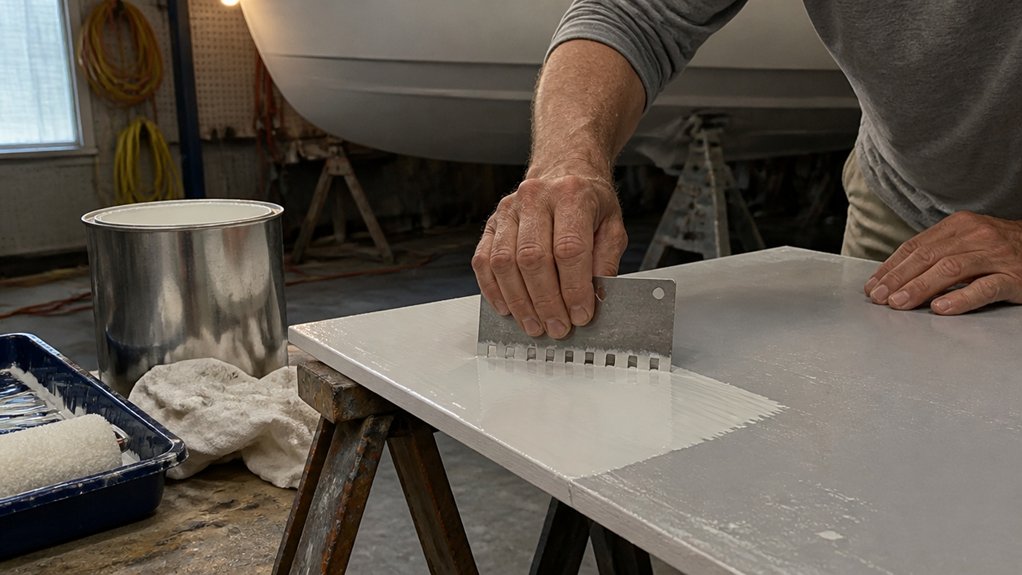
Checking paint thickness on a boat isn’t about checking a box on a spec sheet. It’s the difference between a coating that lasts ten years and one that peels off after a single season.
Checking paint thickness isn’t box-ticking—it’s the line between a ten-year coating and a one-season peel.
Wet-film thickness is your live check, taken with a comb gauge right after you spray. That’s your window to fix coverage before the coating cures, so keep the gauge in your back pocket.
Dry-film thickness is measured later with an electronic gauge, and it tells you what’s actually left after the solvents evaporate. You can’t guess this by eye, because the solvent tricks you into thinking you have more paint than you do. An electronic gauge must be matched to the substrate type, so confirm it reads ferrous steel and non-ferrous aluminum before you start.
Every product has a coating tolerance, a target range you must hit. Go too thin, and saltwater will find every weak spot. Go too thick, and you risk solvent entrapment, which causes blisters and poor curing.
My hands-on advice is to keep both tools nearby. Check wet film on every pass you make with the spray gun, and once the topcoat is fully cured, verify the dry film reading.
Remember that drying time and cure time are different, so wait for the cure before you measure. For a brushed job, keep a wet edge to avoid lap marks, and use painter’s tape and a drop cloth to protect the surrounding areas.
Whether you’re using a primer, a high-gloss topcoat, or a satin finish, the same rule applies: consistent thickness is what protects the wood and metal underneath. A good coat of varnish or polyurethane needs that same discipline, so treat each layer with the same care.
Match your sanding grit to the product, and don’t rush the process. If you stay within the coating tolerance on every coat, you’ll get a finish that holds up.
That’s your ticket to a system that actually works.
When Can You Apply the Next Coat? Recoat Windows and Overcoating
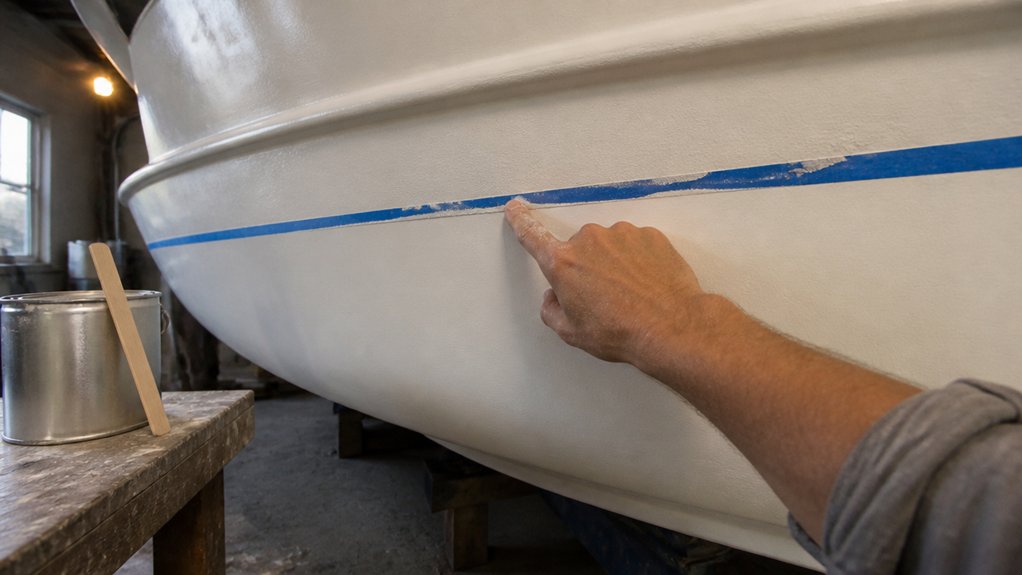
You might think paint is dry and ready for the next coat once it stops feeling sticky, but that’s exactly where recoat windows trip up most boat owners. I’ve been there, rubbing a knuckle against a hull and convinced it’s fine, only to find I’ve ruined adhesion for good.
Overcoat windows aren’t guesses; they’re precise limits printed on your product data sheet. Drying time tells you when the surface is touch-dry, not when it’s chemically ready for another layer of topcoat.
Check the minimum recoat time first, usually 4 to 8 hours at 20°C, but colder air stretches that out. Then look at the maximum overcoat window, often 72 hours, and past that you’ll need a scuff sand with 220 grit.
Wet film thickness matters too, because a heavy coat can take twice as long to dry. Humidity above 80% means you’re just trapping solvents under the new layer, which can ruin the sheen and cause blushing.
Trust the printed numbers, not your fingertips. Use a drop cloth and painter’s tape to keep edges clean, and remember that varnish and polyurethane follow the same rules.
A quick check of the data sheet before you mix saves you from sanding back to bare wood later. Keep a log of your coat times, temperature, and humidity so you don’t guess next time.
Final Inspection: What to Check Before Launching

Before you back that trailer down the ramp, walk the hull like you’re checking a used car you’re already attached to. Look over every edge, seam, and bolt for bare spots or thin coverage.
Walk the hull like it’s a used car you’re already attached to—check every seam, edge, and bolt for bare spots.
Run a gloved hand over the antifouling paint. If it feels rough, that’s a skipped spot you need to mark.
Check the dry film thickness against the spec. Too thin invites blistering, and too thick will crack.
Inspect for runs, sags, or fisheyes in the topcoat. Fix them now, not after the boat splashes.
Post launch touch ups are a pain, since they need divers and special cure times. Plan your dry dock schedule with the yard before you commit to a launch date.
That way, if the inspection fails, you have room to fix it without scrambling. If everything looks clean and smooth, launch it.
If not, sand the problem areas with the right grit, apply a fresh primer, and recoat. Your wallet and hull will thank you later.
Frequently Asked Questions
Can I Paint Over Old Antifouling if It’s Still Sound?
Yes, you can paint over old antifouling if it’s still sound, provided the surface is clean, dry, and firmly bonded.
First, wash the hull with a degreaser and rinse thoroughly, then lightly sand with 80 grit to create a mechanical key.
Test adhesion by pressing duct tape onto a small area and ripping it off; if any flakes come away, you must remove the loose paint first.
Check the label on your new antifouling for compatibility with your existing coating type, since some hard and ablative formulas don’t bond well.
Apply two fresh coats, allowing the recommended dry time between them, typically 4 to 6 hours at 20°C, to avoid solvent trapping.
A quick pull test now saves you from a failed season, and remember to check the overcoating window on the tin.
What Happens if I Paint When Humidity Is Above 80%?
Painting when humidity is above 80% risks trapping moisture between the coating and the substrate. The dew point sits too close to the surface temperature, which prevents proper curing and often leads to blistering, peeling, or a chalky finish.
If you must paint, wait for a dry spell and check that the surface temperature is at least 5°F above the dew point. Use a hygrometer to measure both numbers before you open a can.
A practical workaround is to delay any topcoat until the humidity drops below 70%. Latex paint needs roughly 24 hours at 75°F and 50% humidity to form a durable film. If you cannot wait, apply a thin primer coat and let it dry for 48 hours, then sand lightly with 220 grit to improve adhesion.
Your best move is to never gamble with damp conditions. The extra day of waiting will save you from a repaint job three weeks later.
Can I Store Mixed Two-Pack Paint Overnight in the Fridge?
No, you should not store mixed two-pack paint overnight in the fridge, because cooling only slows the chemical reaction, it does not stop it, and the coating will still be compromised by morning. The partial cure that happens in the cold creates a soft, gummy film that won’t harden properly, even if you bring it back to room temperature and stir it.
Instead, mix only what you need for the job, and if you must pause for a few hours, keep the mixed paint in a sealed container at room temperature, not chilled. For a typical epoxy floor coat, that gives you about 30 to 45 minutes of usable pot life, so plan your application in thin, even passes and have your roller tray ready before you mix.
Fridge storage also risks condensation forming inside the can, which introduces moisture and can cause blushing or poor adhesion on your next coat. Trust me, discard any leftover mixed material and mix fresh for each session, since the cost of wasted paint is far less than stripping a failed finish. Search for “epoxy pot life extension” if you need more details, but the safe rule is always fresh mix.
Is Brush Application Ever Acceptable for Large Hull Areas?
For large hull areas, brush application is never acceptable when speed and film uniformity matter.
Your brush simply cannot lay down material at the rate a sprayer achieves, and you will end up with lap marks and uneven dry film thickness.
Use a roller with a 3/8 inch microfiber cover for spot touch-ups instead, as it mimics spray texture better than a brush.
This approach works well for patch priming or edge work, but for entire topsides, commit to airless spray or conventional HVLP equipment.
One practical tip: if you must brush a small section, thin the coating by 5% to 10% per the label, and back-roll immediately to level out brush strokes.
Drying time will run 30 to 50 minutes longer than sprayed coats, so plan your recoat window, typically 6 hours for two-part polyurethane.
For related guidance, search “roller application marine paint” to see how professionals blend tools without sacrificing finish.
How Do I Fix Paint That Was Launched Before Full Cure?
To fix paint that was launched before full cure, you must remove the uncured or compromised coating and start over, because early immersion guarantees adhesion failure and solvent entrapment. Dry-dock the surface, then inspect for blisters, soft spots, or solvent pop, and mark every suspect area with chalk.
Next, abrasive-blast the entire coating back to bare, sound substrate, using a medium grit like 60 to 80 mesh sand or aluminum oxide, and feather any edges to avoid a hard ridge. Do not sandblast with fine grit, as it can polish the surface and reduce mechanical key for the new coat.
After blasting, wipe down with a dewaxing solvent and let it flash off completely. Recoat strictly per the manufacturer’s cure schedule, including the minimum overcoat window, and use a dew point meter to confirm the surface stays at least 5°F above condensation. For a typical two-part polyurethane, that means waiting 16 hours at 70°F before launching, not just until touch-dry.
Rounding Up
Applying marine paints means prepping, mixing, and rolling in the correct order, and skipping the dew point check is a guaranteed failure. Take the practical steps below to protect your hull and your wallet.
Check the dew point before you mix anything, since applying two-pack over damp surfaces ruins the cure. Write down your recoat windows and treat them as hard deadlines, not flexible suggestions.
Compare your surface temperature to the dew point, and stop work if they are within a few degrees. Test your mixed batch on a small area first, and verify adhesion before committing to the full coat.
If you want to read next, look up antifouling paint application for below the waterline.


